
How to validate AI-generated codes in your analysis
Key takeaways
- AI Coding can help identify potential themes and patterns, but AI-generated codes should always be reviewed before using them in your final analysis.
- Validating AI-generated codes helps improve consistency, accuracy, transparency, and methodological rigor.
- Researchers should compare AI-generated codes against the original data, research question, and analytical goals.
- Common validation tasks include renaming codes, merging duplicates, splitting broad codes, removing irrelevant codes, and reorganizing codes into a meaningful structure.
- AI Coding should support, not replace, researcher interpretation and decision-making.
Who this article is for
This article is for anyone using AI Coding in ATLAS.ti Web or ATLAS.ti Desktop who wants to review and validate AI-generated codes before using them in their analysis, reports, or publications.
What does it mean to validate AI-generated codes?
Validating AI-generated codes means reviewing the codes and their linked quotations to decide whether they accurately represent the data and support your research goals.
During validation, you may:
- rename unclear codes
- merge duplicate or overlapping codes
- split broad codes into more specific codes
- remove irrelevant codes
- reorganize codes into categories or groups
- document coding decisions in memos
AI-generated codes should be treated as suggestions. They can provide a useful starting point, but they should not be treated as final analytical decisions without researcher review.
Why should you review AI-generated codes?
AI Coding can quickly identify recurring topics and suggest coding structures. However, AI does not understand your research context, methodology, or analytical goals in the same way a researcher does.
AI-generated codes may:
- overlap with each other
- be too broad or too specific
- use unclear wording
- miss important context
- create codes that are not relevant to your research question
- group different ideas under the same label
Reviewing AI-generated codes helps ensure that your analysis reflects the meaning of the data and your research objectives.
Before reviewing AI-generated codes
Before validating AI Coding results, revisit your:
- research question
- research goals
- methodology
- coding framework, if applicable
Ask yourself:
- What am I trying to learn from the data?
- What themes are most relevant to my research?
- Am I using a deductive, inductive, or mixed approach?
- What level of detail do I need in my coding structure?
- Which codes are useful for answering my research question?
These questions will help guide your review process.
Step 1: Review AI-generated codes individually
Start by reviewing each AI-generated code one at a time.
For each code, ask:
- Does the code accurately describe the quotations attached to it?
- Is the code name clear and meaningful?
- Would another researcher understand the code?
- Is the code relevant to the research question?
- Is the code too broad, too narrow, or too vague?
Step 2: Review quotations linked to each code
The best way to validate a code is to review the quotations attached to it.
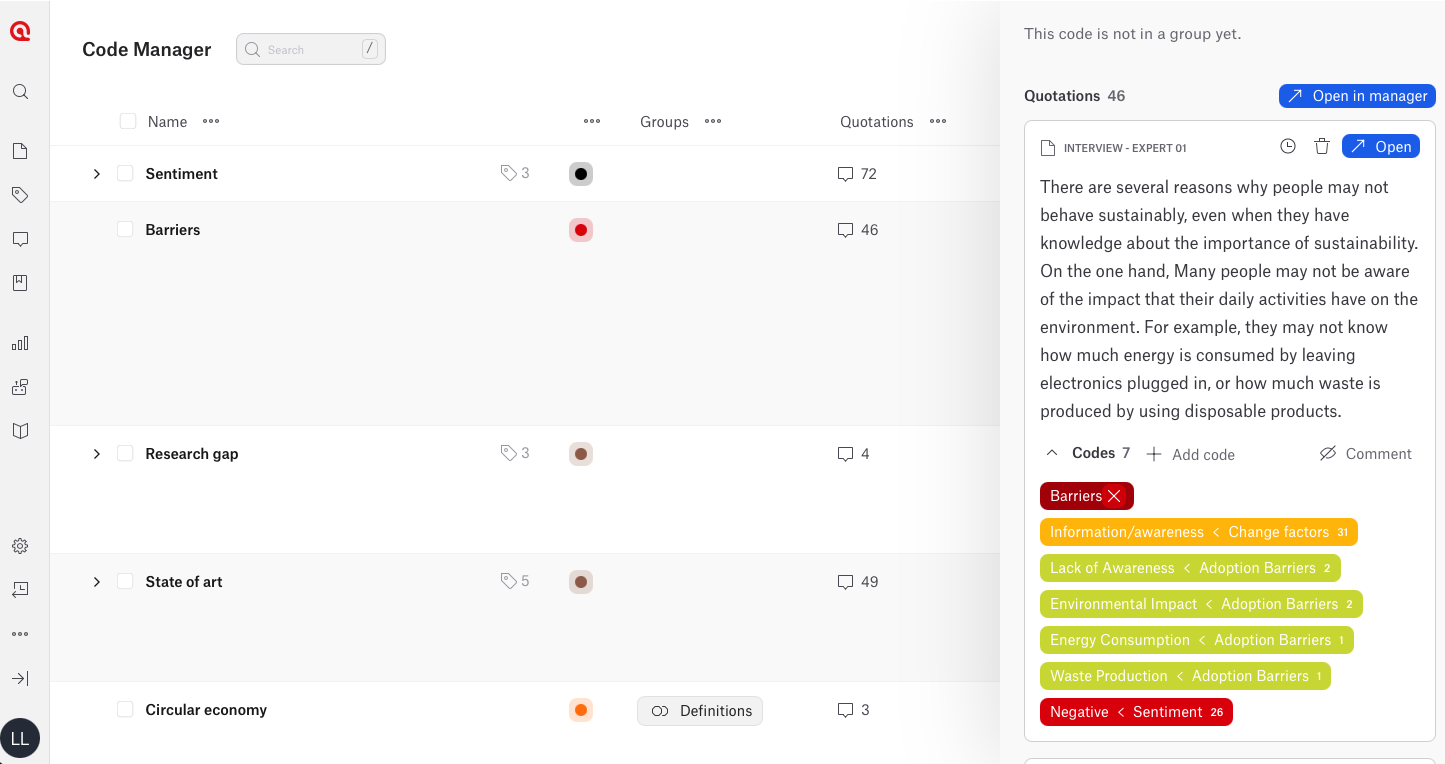
- In ATLAS.ti Web
- Open the Code Manager.
- Select a code.
- Review the linked quotations.
- Open quotations in context if needed.
- Check whether the quotations match the meaning of the code.
- In ATLAS.ti Windows and Mac
- Open the Code Manager.
- Select or double-click a code to review its linked quotations.
- Review all quotations associated with the code.
- Compare the quotations with the code name and definition.
Ask yourself:
- Do all quotations belong together?
- Are some quotations incorrectly coded?
- Are there multiple themes hidden within the same code?
- Does the code need a clearer definition?
Step 3: Merge duplicate or overlapping codes
AI Coding may generate multiple codes that describe similar concepts.
Examples:
- communication challenges
- communication problems
- poor communication
These may be better represented by a single code.
When reviewing codes:
- Identify similar or overlapping codes.
- Compare their linked quotations.
- Decide whether the codes represent the same concept.
- Merge codes when appropriate.
- Update the code name and comment if needed.
- In ATLAS.ti Web
- Go to the Code Manager.
- Tick the boxes to the left of the codes you want to merge.
- Click the three dots at the bottom of the screen.
- Select Merge codes.
- Enter the name of the new merged code.
- Confirm the merge.
When you merge codes in ATLAS.ti Web, the audit trail is saved in the comment field of the merged code.

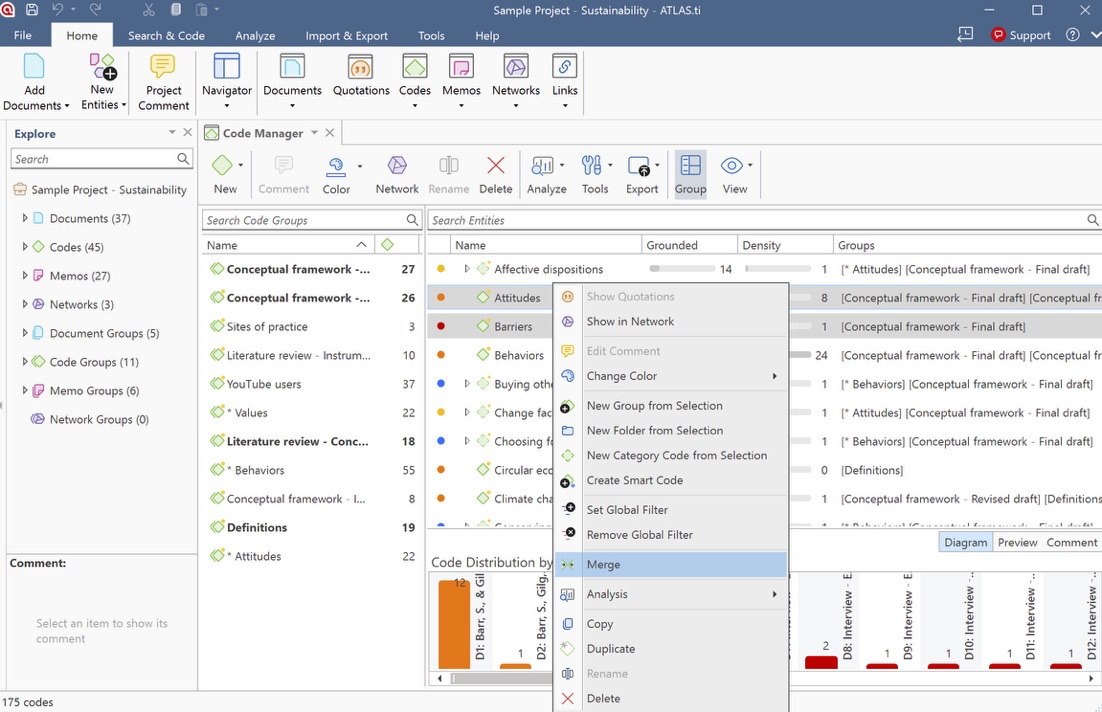
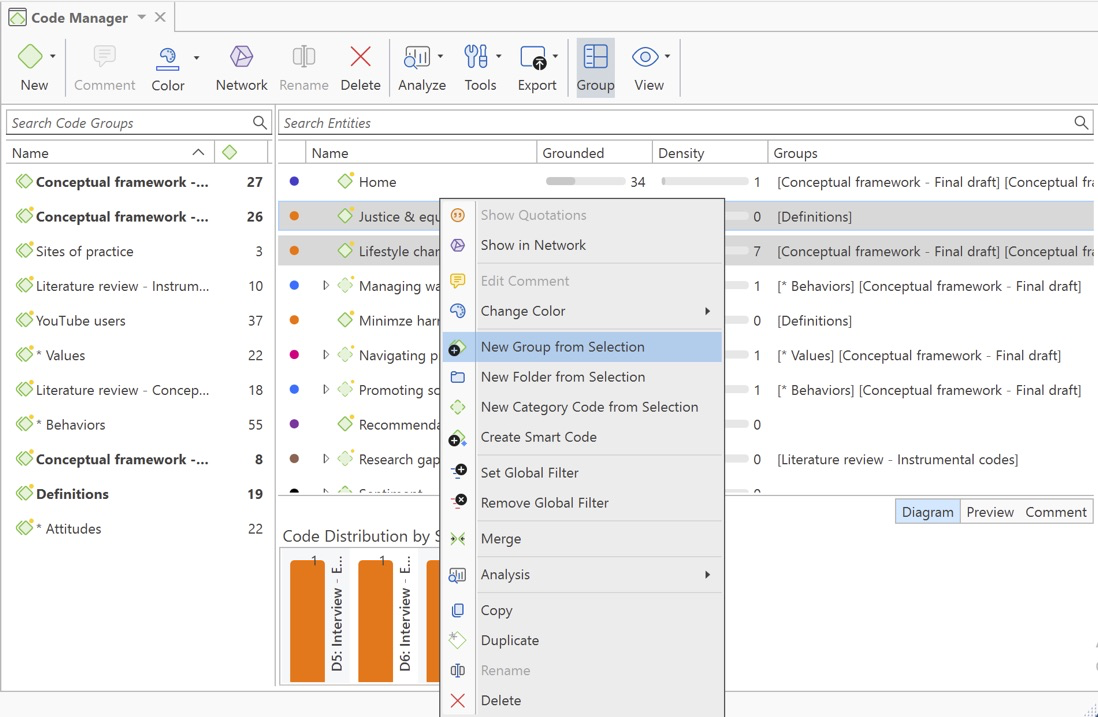
- In ATLAS.ti Windows and Mac
- Open the Code Manager.
- Select the codes you want to merge.
- Right click and select "Merge" or you can drag and drop the code
- Choose the final code name.
- Review the merged code and linked quotations.

Step 4: Split codes that contain multiple ideas
Sometimes AI creates codes that are too broad.
If a code contains several distinct concepts:
- Create new, more specific codes.
- Review the quotations attached to the original code.
- Reassign quotations to the most appropriate codes.
- Remove or redefine the original code if necessary.
In ATLAS.ti Web, there is no direct Split Code function. You can still split a code manually by reviewing the quotations linked to the broad code, creating more specific codes, and reassigning quotations. In ATLAS.ti Desktop, you can use the Split code function.
- In ATLAS.ti Web
Split codes manually in ATLAS.ti Web
Option 1: Use the Quotation Manager
- Open your ATLAS.ti Web project.
- Click the Quotations icon in the left-hand menu to open the Quotation Manager.
- Click Filter.
- Choose Code as the filter type.
- Select the broad code you want to split.
- Click Apply.
- The Quotation Manager now displays the quotations linked to that code.
- Click Details to review the quotation on the side bar
- Click Open if you need to see it in the original document context.
- Decide which more specific code should be applied to the quotation.
- Apply an existing code or create a new code for the quotation.
- If the broad code should no longer apply, remove the broad code from that quotation.
- Repeat this process until all quotations linked to the broad code have been reviewed.
After reviewing all quotations, you can decide whether to keep, rename, or delete the original broad code.
Option 2: Use the Code Manager
- Open your ATLAS.ti Web project.
- Click the Codes icon in the left-hand menu to open the Code Manager.
- Select the broad code you want to split.
- Click Details to open the sidebar.
- Review the quotations linked to that code.
- Open each quotation to inspect it in context if needed.
- Apply a more specific existing code or create a new code.
- Remove the broad code from the quotation if it is no longer appropriate.
- Repeat this process for each linked quotation.
This manual workflow allows you to split the meaning of a broad code into several more precise codes, even though ATLAS.ti Web does not currently include a dedicated split-code function.
- In ATLAS.ti Window
- Open the Code Manager.
- Select the code you want to split.
- Click Tools in the ribbon
- Select Split Code
Alternative option:
- Right-click the code in the Code Manager, Project Explorer, or Code Browser.
- Select Split Code

Then continue in the Split Code tool:
- Review the list of quotations linked to the original code.
- Click Add Codes.
- Enter the labels for the new codes.
- Press the down arrow to move to the next entry field and enter another code label.
- Click Create when all new code labels have been entered.
- Select a quotation in the list.
- Review the quotation content shown at the bottom of the screen.
- Assign the quotation to one or more new codes by clicking the relevant checkboxes.
- Repeat this process for the remaining quotations.
- Select options such as Copy Comments, Copy links, or Mutually exclusive if needed.
- Click Split Code.

- In ATLAS.ti Mac
- Open the Code Manager or Project Explorer.
- Right-click the code you want to split.
- Select Split.

Then continue in the Split Code tool:
- Review the list of quotations linked to the original code.
- Click Add Codes.
- Enter the labels for the new codes.
- Press the right arrow to move to the next entry field and enter another code label.
- Click Add when all new code labels have been entered.
- Select a quotation in the list.
- Review the quotation content shown at the bottom of the screen.
- Assign the quotation to one or more new codes by clicking the relevant checkboxes.
- Repeat this process for the remaining quotations.
- Select options such as Copy Comments, Copy links, or Mutually exclusive if needed.
- Click Split Code.

AI Coding helps you explore patterns in your data by generating categories and subcodes. You reorganize these codes.
Remove a subcode from a category
- In ATLAS.ti Web
You can move a subcode back to the root level if it should no longer belong to a category.
Option 1: Drag and drop
- Open the Code Manager.
- Drag the subcode onto the blue Move to root area.
- Release the code.
Option 2: Move codes menu
- Tick the box next to the subcode.
- Click the three-dot menu at the bottom of the screen.
- Select Move codes.
- Choose Root level (no parent code).
The subcode becomes an independent code again.

- In ATLAS.ti Windows and Mac
Use Code Manager
- Open the Code Manager.
- Drag the subcode toward the left edge of the Code Manager.
- Wait until the vertical blue highlight appears.
- Release the code.
The code becomes an independent code again. You can also drag the subcode onto Codes in the Project Explorer to move it back to the root level.
Use Network
You can also remove the relationship between a category code and a subcode by using a Network. This keeps both codes in the project, but the selected code will no longer appear as a subcode under that category.
- Open the Code Manager.
- Right-click the category code.
- Select Show in Network.
Alternatively:
- Open or create a new Network.
- Drag the category code into the Network.
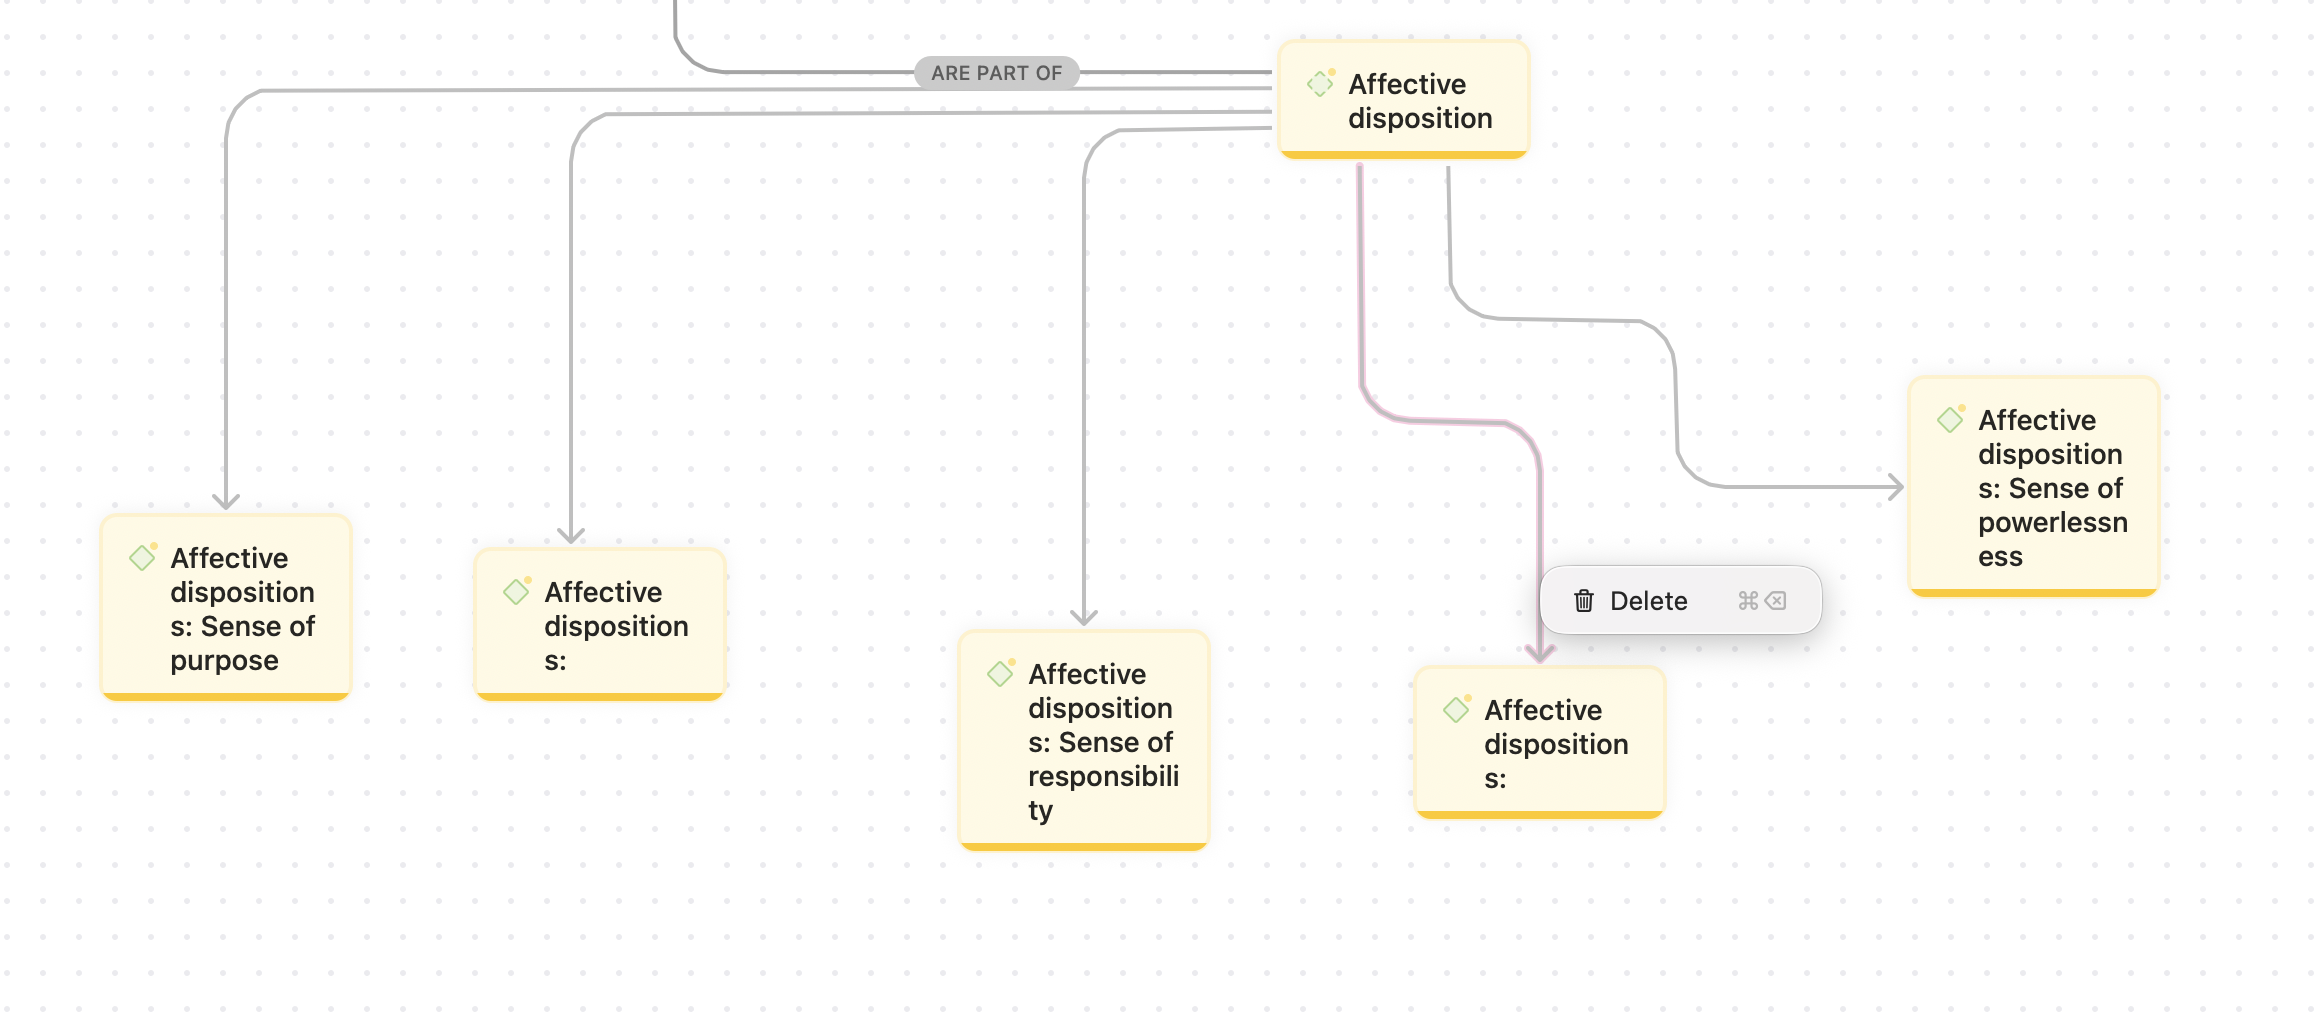
Then:
- Right-click the category code in the Network.
- Select Add Neighbors.
- Select Linked Codes.
- Locate the link between the category code and the subcode you want to remove.
- Select the arrow or link between the category code and the subcode.
- Press Delete or select Delete from the available menu.
This removes the link between the category code and the subcode. The subcode remains in the project, but it is no longer placed under that category.
Step 5: Remove irrelevant codes carefully
Not every AI-generated code needs to remain in the project.
You can either delete a code from the project entirely or remove the code only from a specific quotation or document while keeping the code available in the project.
Delete code from the project
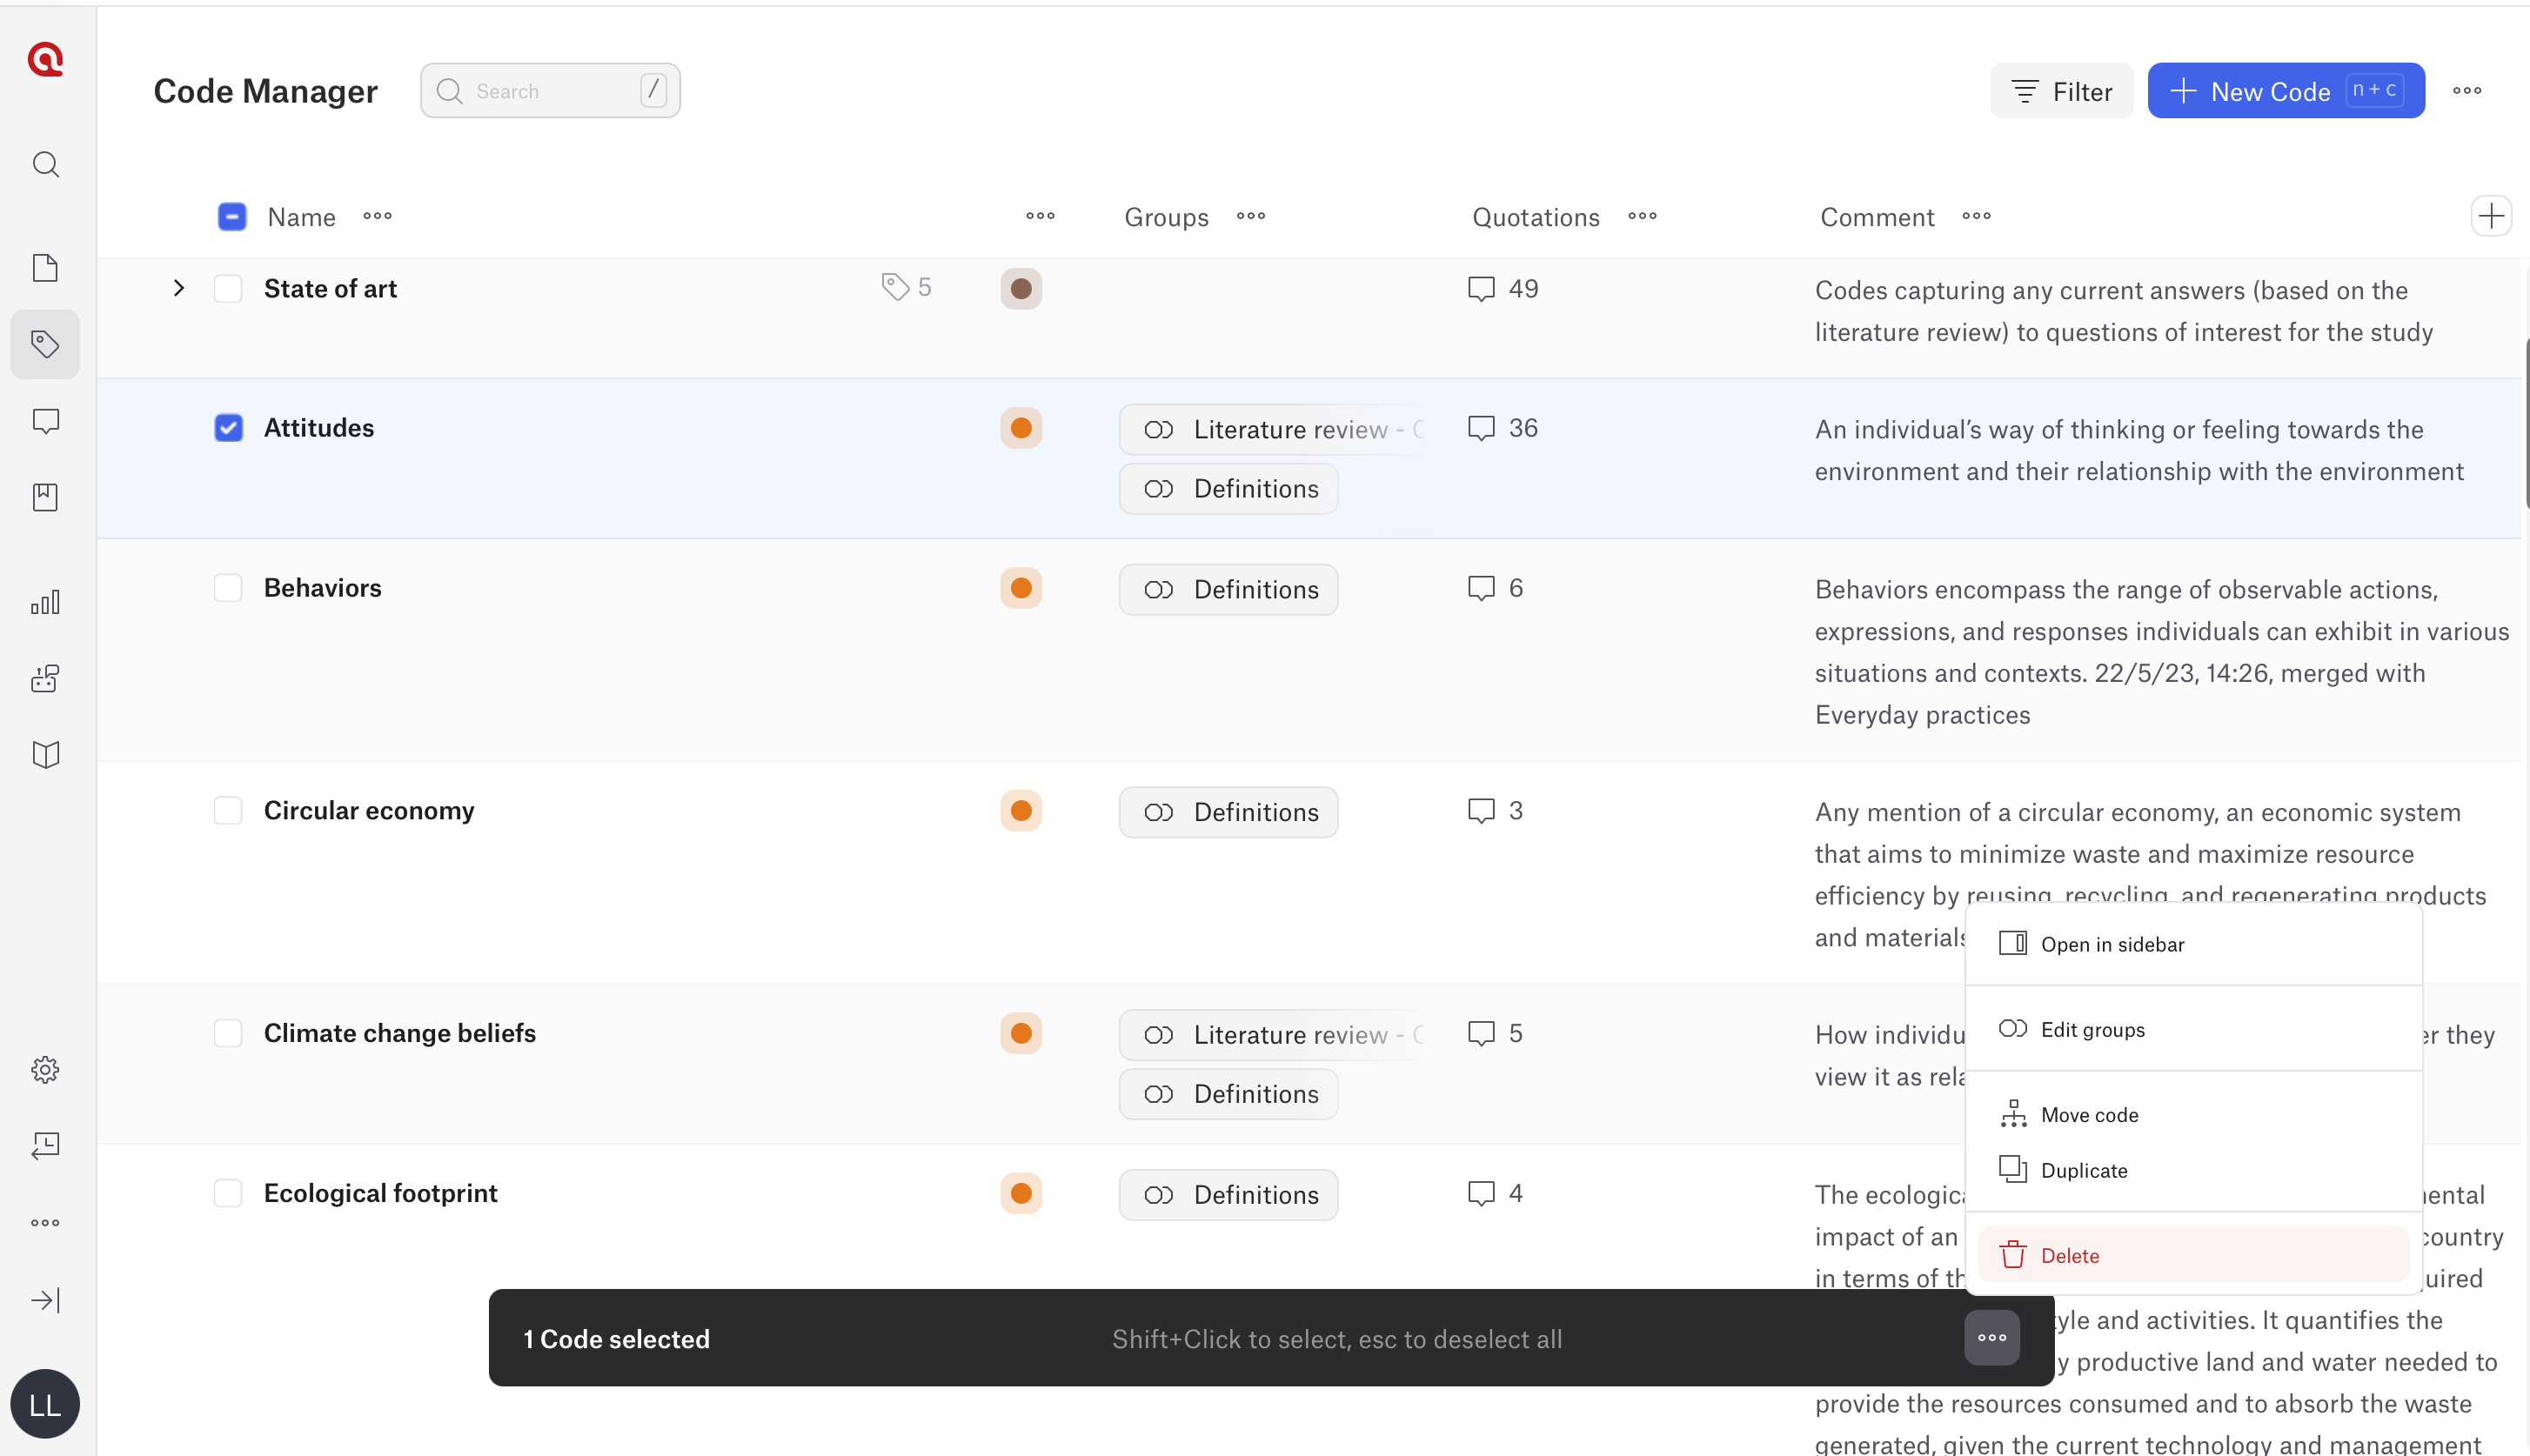
- In ATLAS.ti Web
- Go to the Code Manager.
- Tick the box to the left of each code you want to delete.
- Click the three dots at the bottom of the screen.
- Select Delete.
- Confirm the deletion if prompted.
- In ATLAS.ti Windows
- Open the Code Manager.
- Select the code(s) you want to delete.
- Click Delete in the ribbon.
Alternatively:
- Right-click the code(s) in the Code Manager or Project Explorer.
- Select Delete.
After selecting Delete, ATLAS.ti asks whether you also want to delete the quotations associated with the code, if any.
- Click Yes if you want to delete the associated quotations as well.
- Click No if you want to keep the quotations and only delete the code from the project.

- In ATLAS.ti Mac
- Open the Code Manager or Project Explorer.
- Right-click the code(s) you want to delete.
- Select Delete.

Remove a code from a quotation
Use this option when you want to remove a code from a specific quotation but keep the code in the project.
- In ATLAS.ti Web
Option 1: Use the Quotation Manager
- Open the Quotation Manager.
- If needed, click Filter and choose Code as the filter type.
- Select the code you want to review and apply the filter.
- In the quotation list, review the codes shown under the Codes column.
- To add or remove a code directly from the quotation list, click the code area next to the quotation and toggle the relevant code on or off.
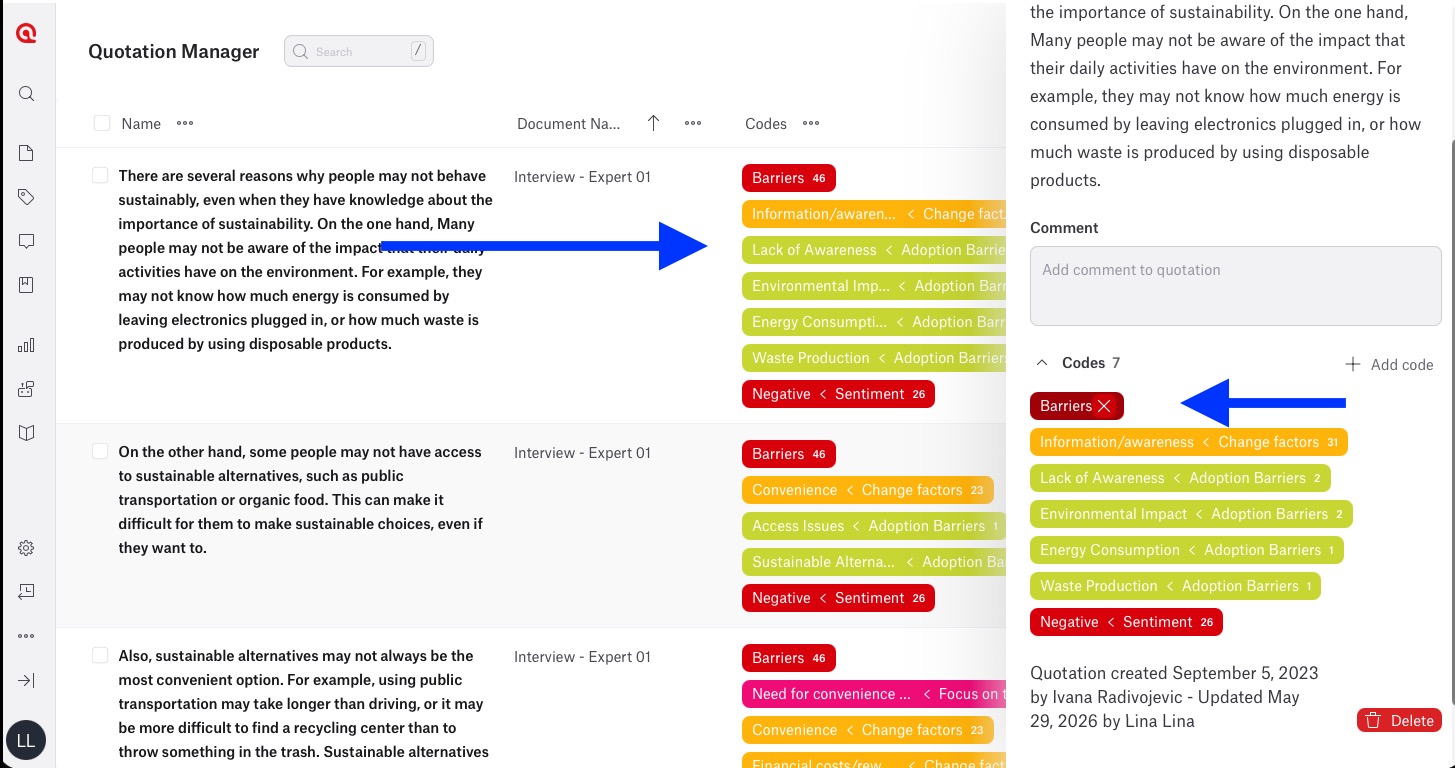
- Alternatively, click Details to open the quotation sidebar.
- In the sidebar, review the codes attached to the quotation.
- Click the X next to a code to remove it from that quotation.
- Click Open if you need to view the quotation in the original document.
- In the document view, select the quotation and toggle off the code you want to remove, or click the code directly and click X.
Option 2: Use the Code Manager
- Click the Codes icon in the left-hand menu to open the Code Manager.
- Select the code you want to review.
- Click Details to open the sidebar.
- Review the quotations linked to that code.
- In the sidebar, expand the codes display for the quotation.
- Select the code you want to remove.
- Select the code you want to remove.
- In ATLAS.ti Windows and Mac
- Open the document that contains the coded quotation, or open the Quotation Manager.
- Select the quotation.
- In the quotation preview or coding area, right-click the code you want to remove.
- Select Remove Coding.
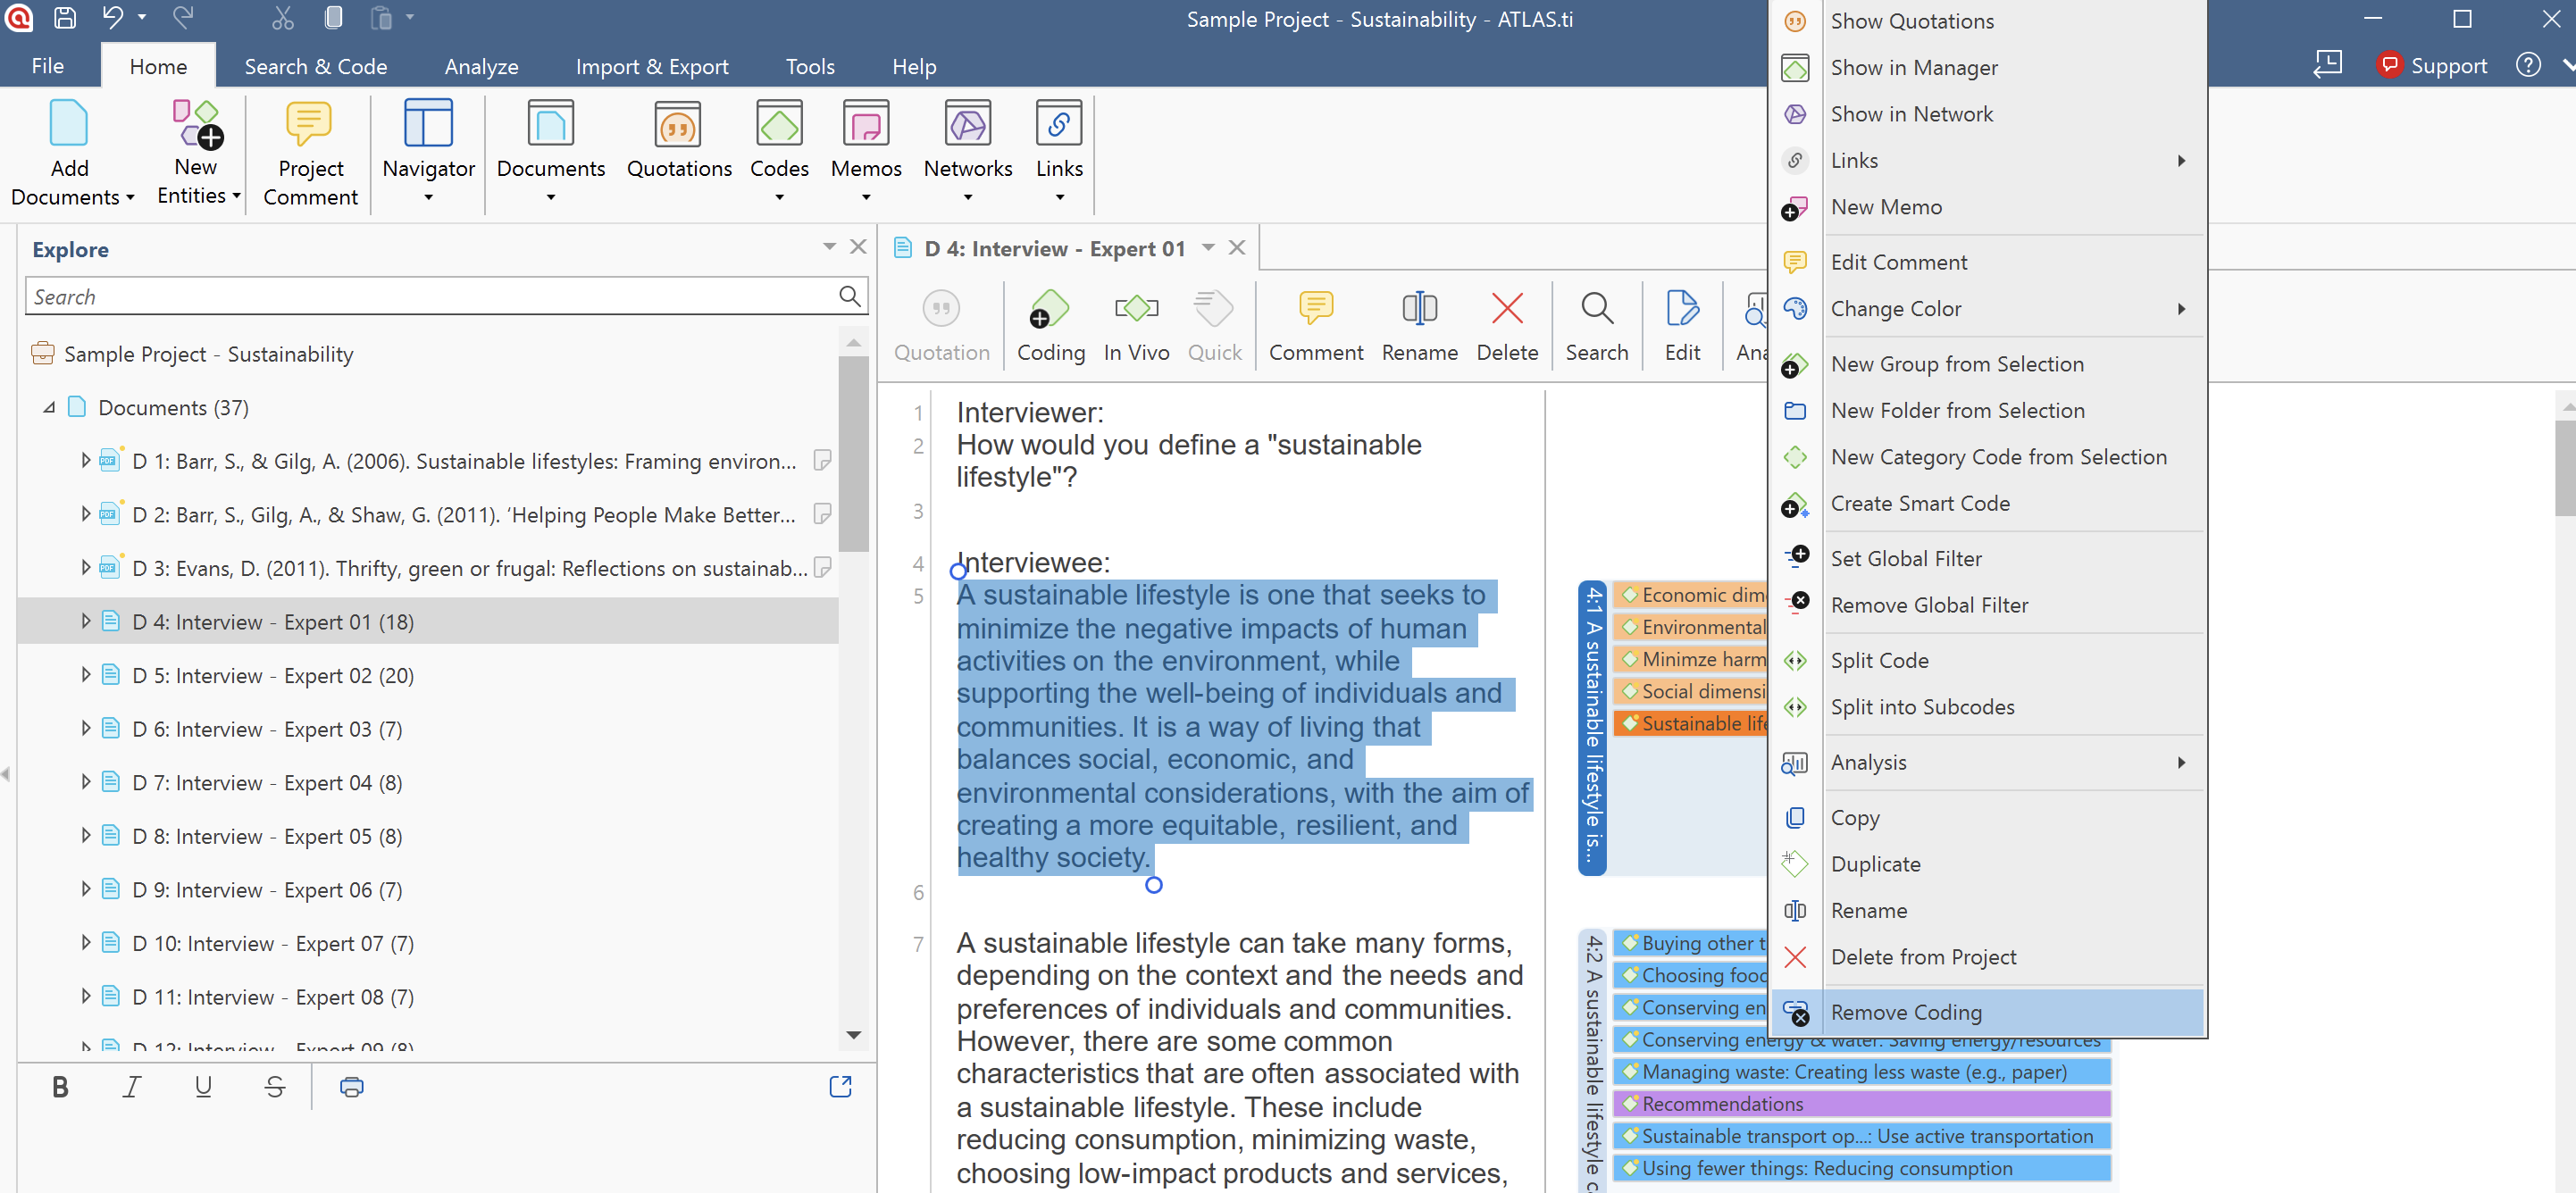
This removes the selected code from that quotation only. The code remains available in the project and can still be applied to other quotations.
Remove all codings from selected documents
Use this option when you want to remove codings from one or more documents while keeping the quotations and codes in the project.
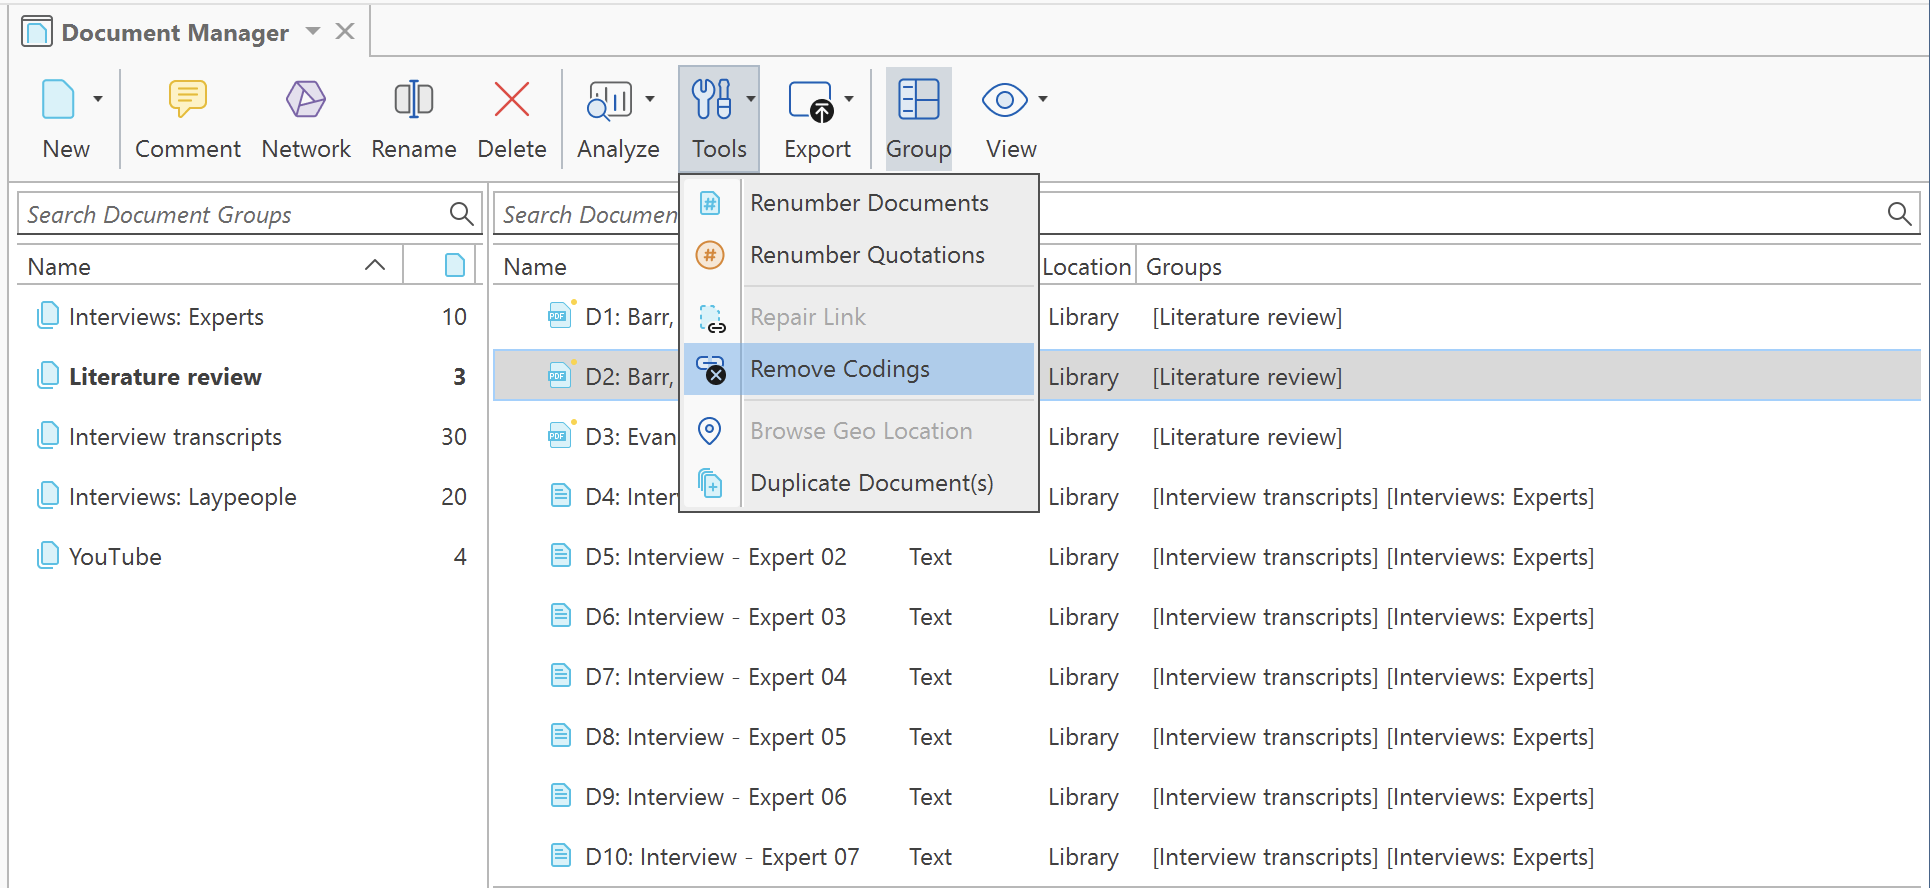
- In ATLAS.ti Windows only
- Open the Document Manager.
- Select the document or documents.
- Click Tools.
- Select Remove Codings.
- Confirm the action if prompted.
The selected document remains in the project, and the quotations are kept, but the codings are removed from that document.
Step 6: Organize codes into a meaningful structure
Once individual codes have been reviewed, organize them into a clear coding structure. You can organize codes into groups, folders, or a hierarchy using categories and subcodes, depending on how you want to structure
Organize codes with folders ( Desktop only)
Folders are useful when you need another level of organization for a large code system.
In ATLAS.ti Windows and Mac
- Open the Code Manager.
- Click New.
- Select Folder.
- Enter the folder name.
- Move codes or categories into the folder as needed.
You can also select one or more codes, right-click them, and select New Folder from Selection.

Organise Codes into Groups
- In ATLAS.ti Web
- Go to the Code Manager.
- Hover over a code.
- Click Details to open the sidebar.
- Click Edit groups.
- Select an existing group or create a new group.
- To rename or delete groups, click Manage Groups.
- Save your changes.

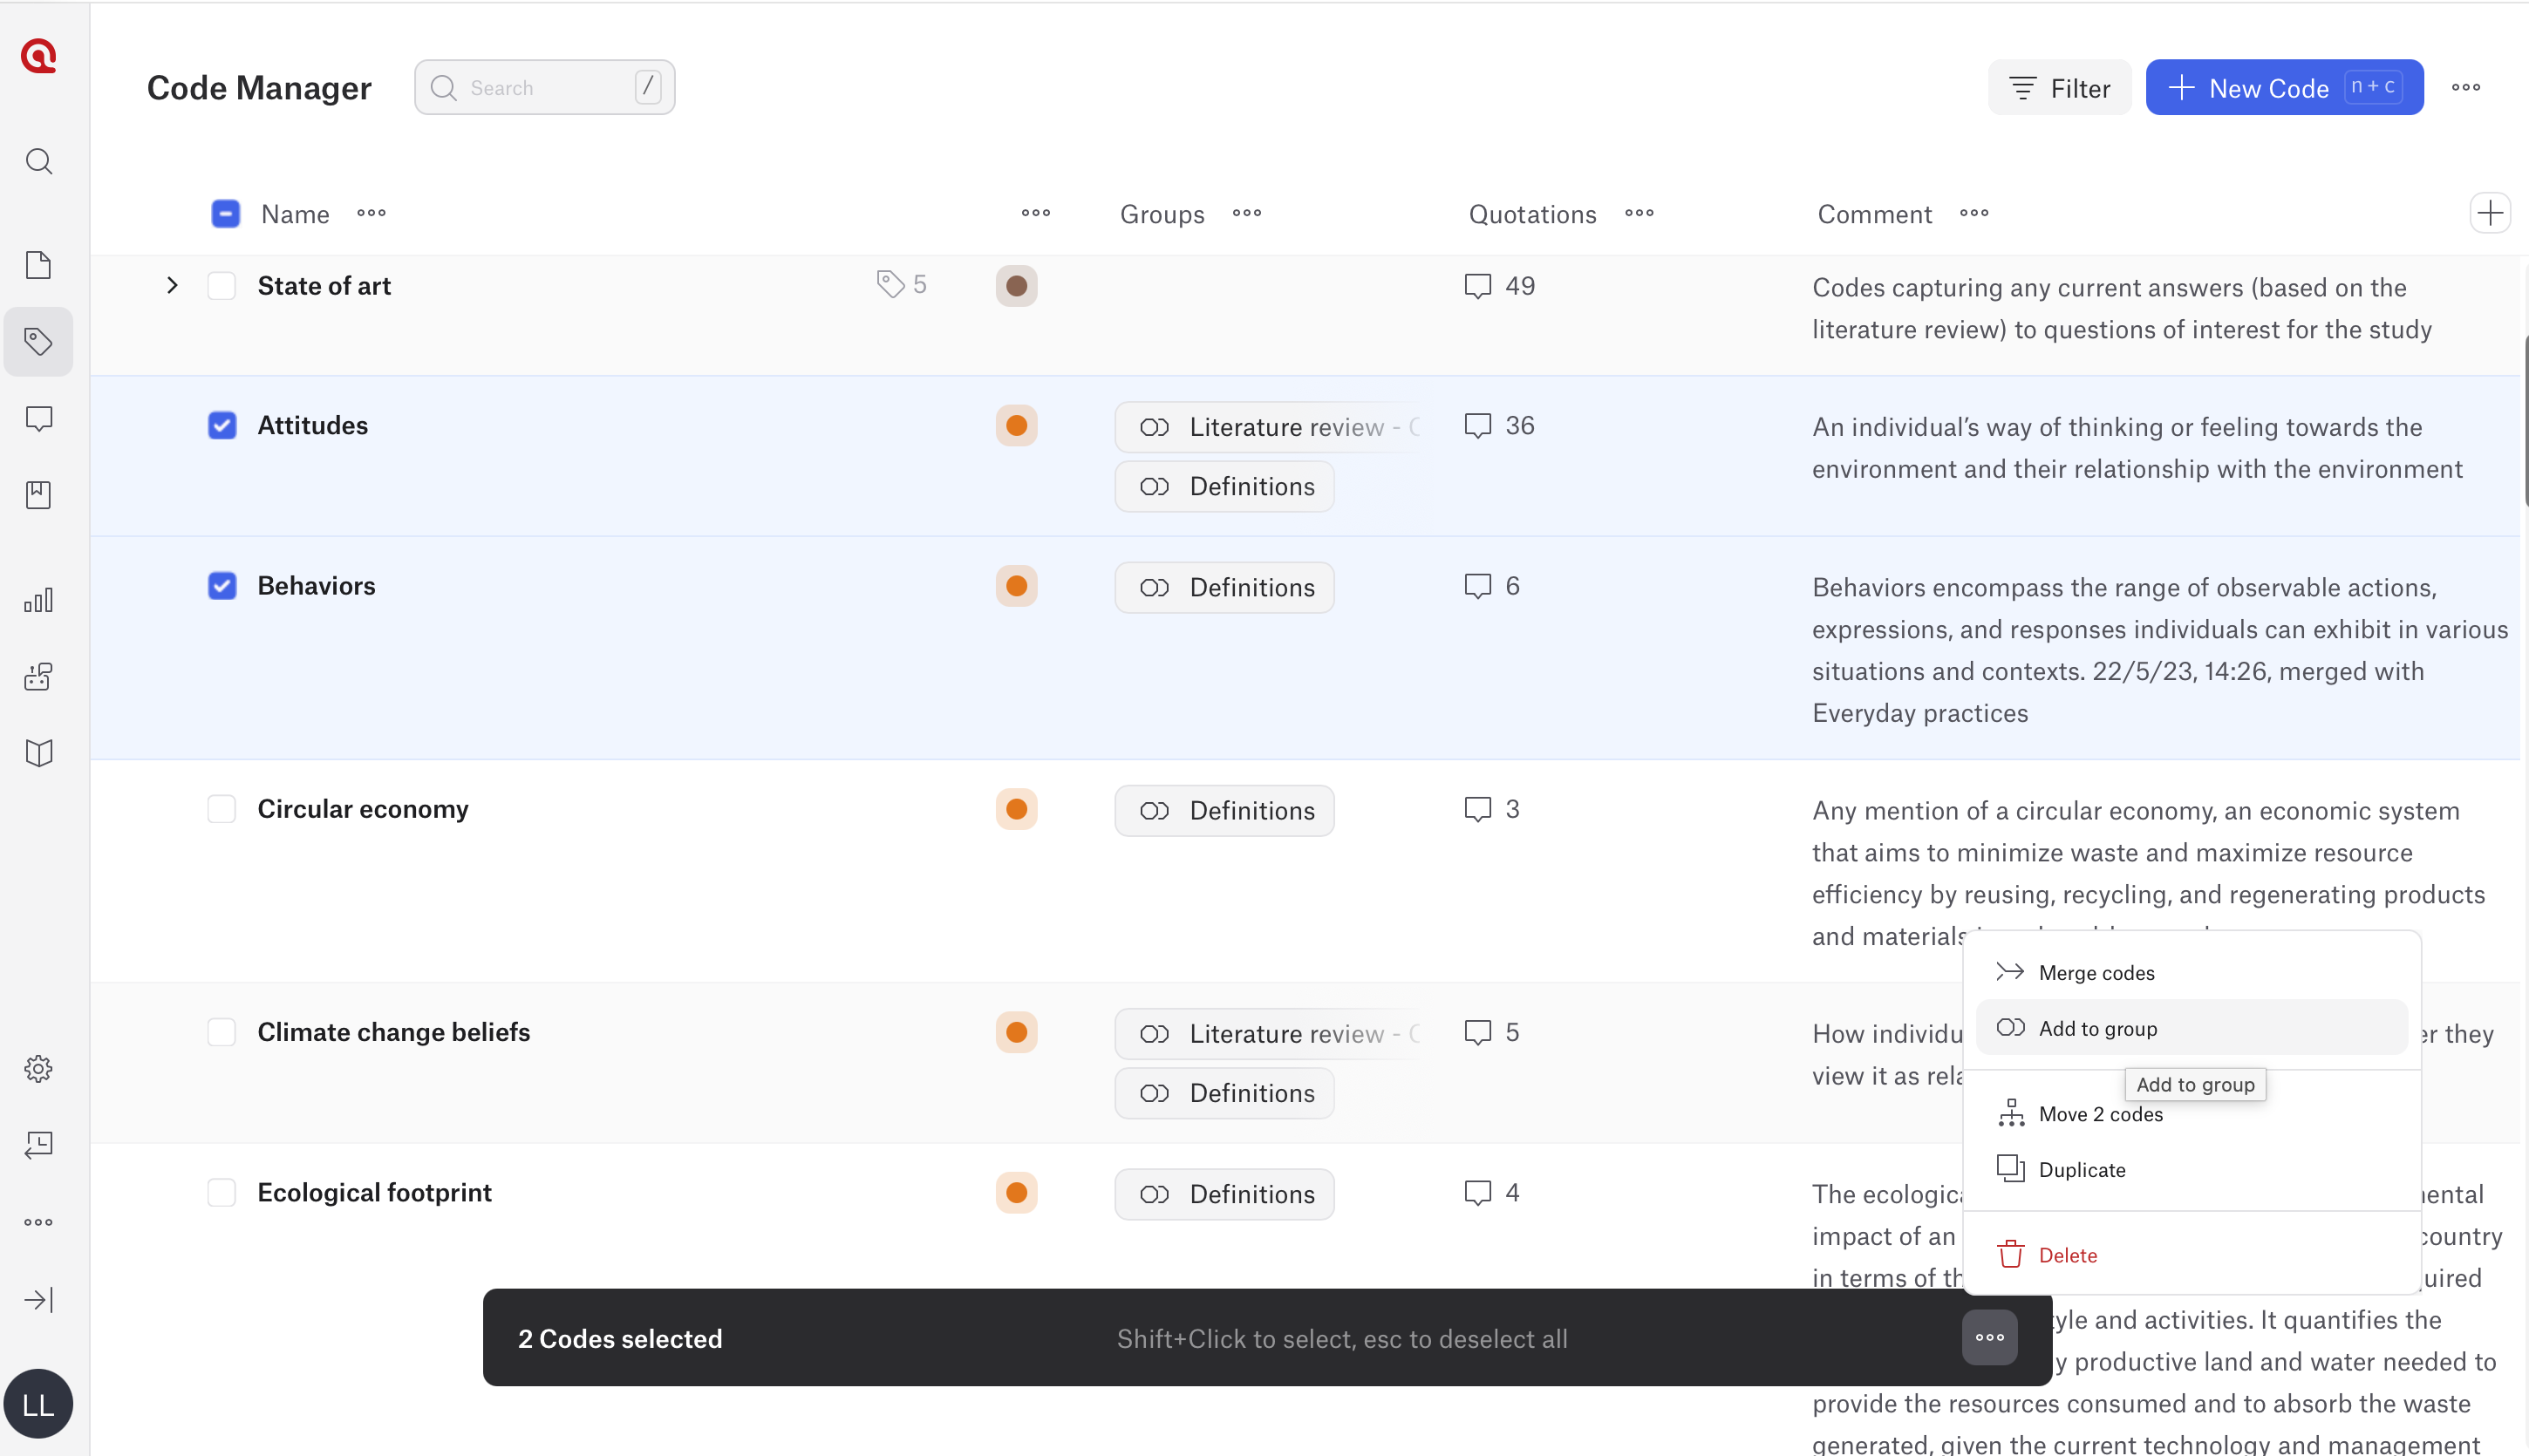
- To add multiple codes into a group:
- Tick the boxes to the left of the codes you want to group.
- Click the three dots at the bottom of the screen.
- Select Add to group.
- Choose the desired code group.
- In ATLAS.ti Windows and Mac
- Open the Code Manager.
- Select one or more codes.
- Create a new code group or add the selected codes to an existing group.
- Use the group filter area to view codes from selected groups.
Organize codes into categories and subcodes
- In ATLAS.ti Web
Create subcodes by drag and drop
- Open the Code Manager.
- Click + New Code.
- Enter the name of the category code.
- Click Create new code.

- In the Code Manager, locate the code you want to turn into a subcode.
- Drag the code onto the empty category code.
- Select Make subcode of....
- Repeat this process for any other codes you want to place under the same category.

The selected codes will appear underneath the category code.
Move multiple codes into a category
- Open the Code Manager.
- Tick the boxes next to the codes you want to move.
- Click the three-dot menu at the bottom of the screen.
- Select Move codes.
- Choose the category code.
- Confirm the move.

The selected codes will become subcodes of the category code.
In ATLAS.ti Desktop
Create a category by drag and drop
In ATLAS.ti Windows and Mac
- Open the Code Manager.
- Click New.
- Select Code.
- Enter the name of the category code.
- Confirm the new code.
- Select one or more existing codes that should become subcodes.
- Drag the selected code or codes onto the empty category code.
- Select Move code ... under ....
- Review the new hierarchy in the Code Manager.

Create a category from selected codes
In ATLAS.ti Windows and Mac
- Open the Code Manager.
- Select the codes that should become subcodes.
- Right-click the selected codes.
- Select New Category Code from Selection.
- Enter the name of the new category code.
- Confirm the action.
The selected codes become subcodes under the new category code.


Step 7: Compare codes against your research goals
After cleaning up the coding structure, compare it against your original research objectives.
Ask:
- Do these codes help answer the research question?
- Are important themes missing?
- Have unexpected but important themes emerged?
- Does the coding structure support my methodology?
- Are the codes useful for reporting findings?
This step helps ensure that the analysis remains focused and relevant.
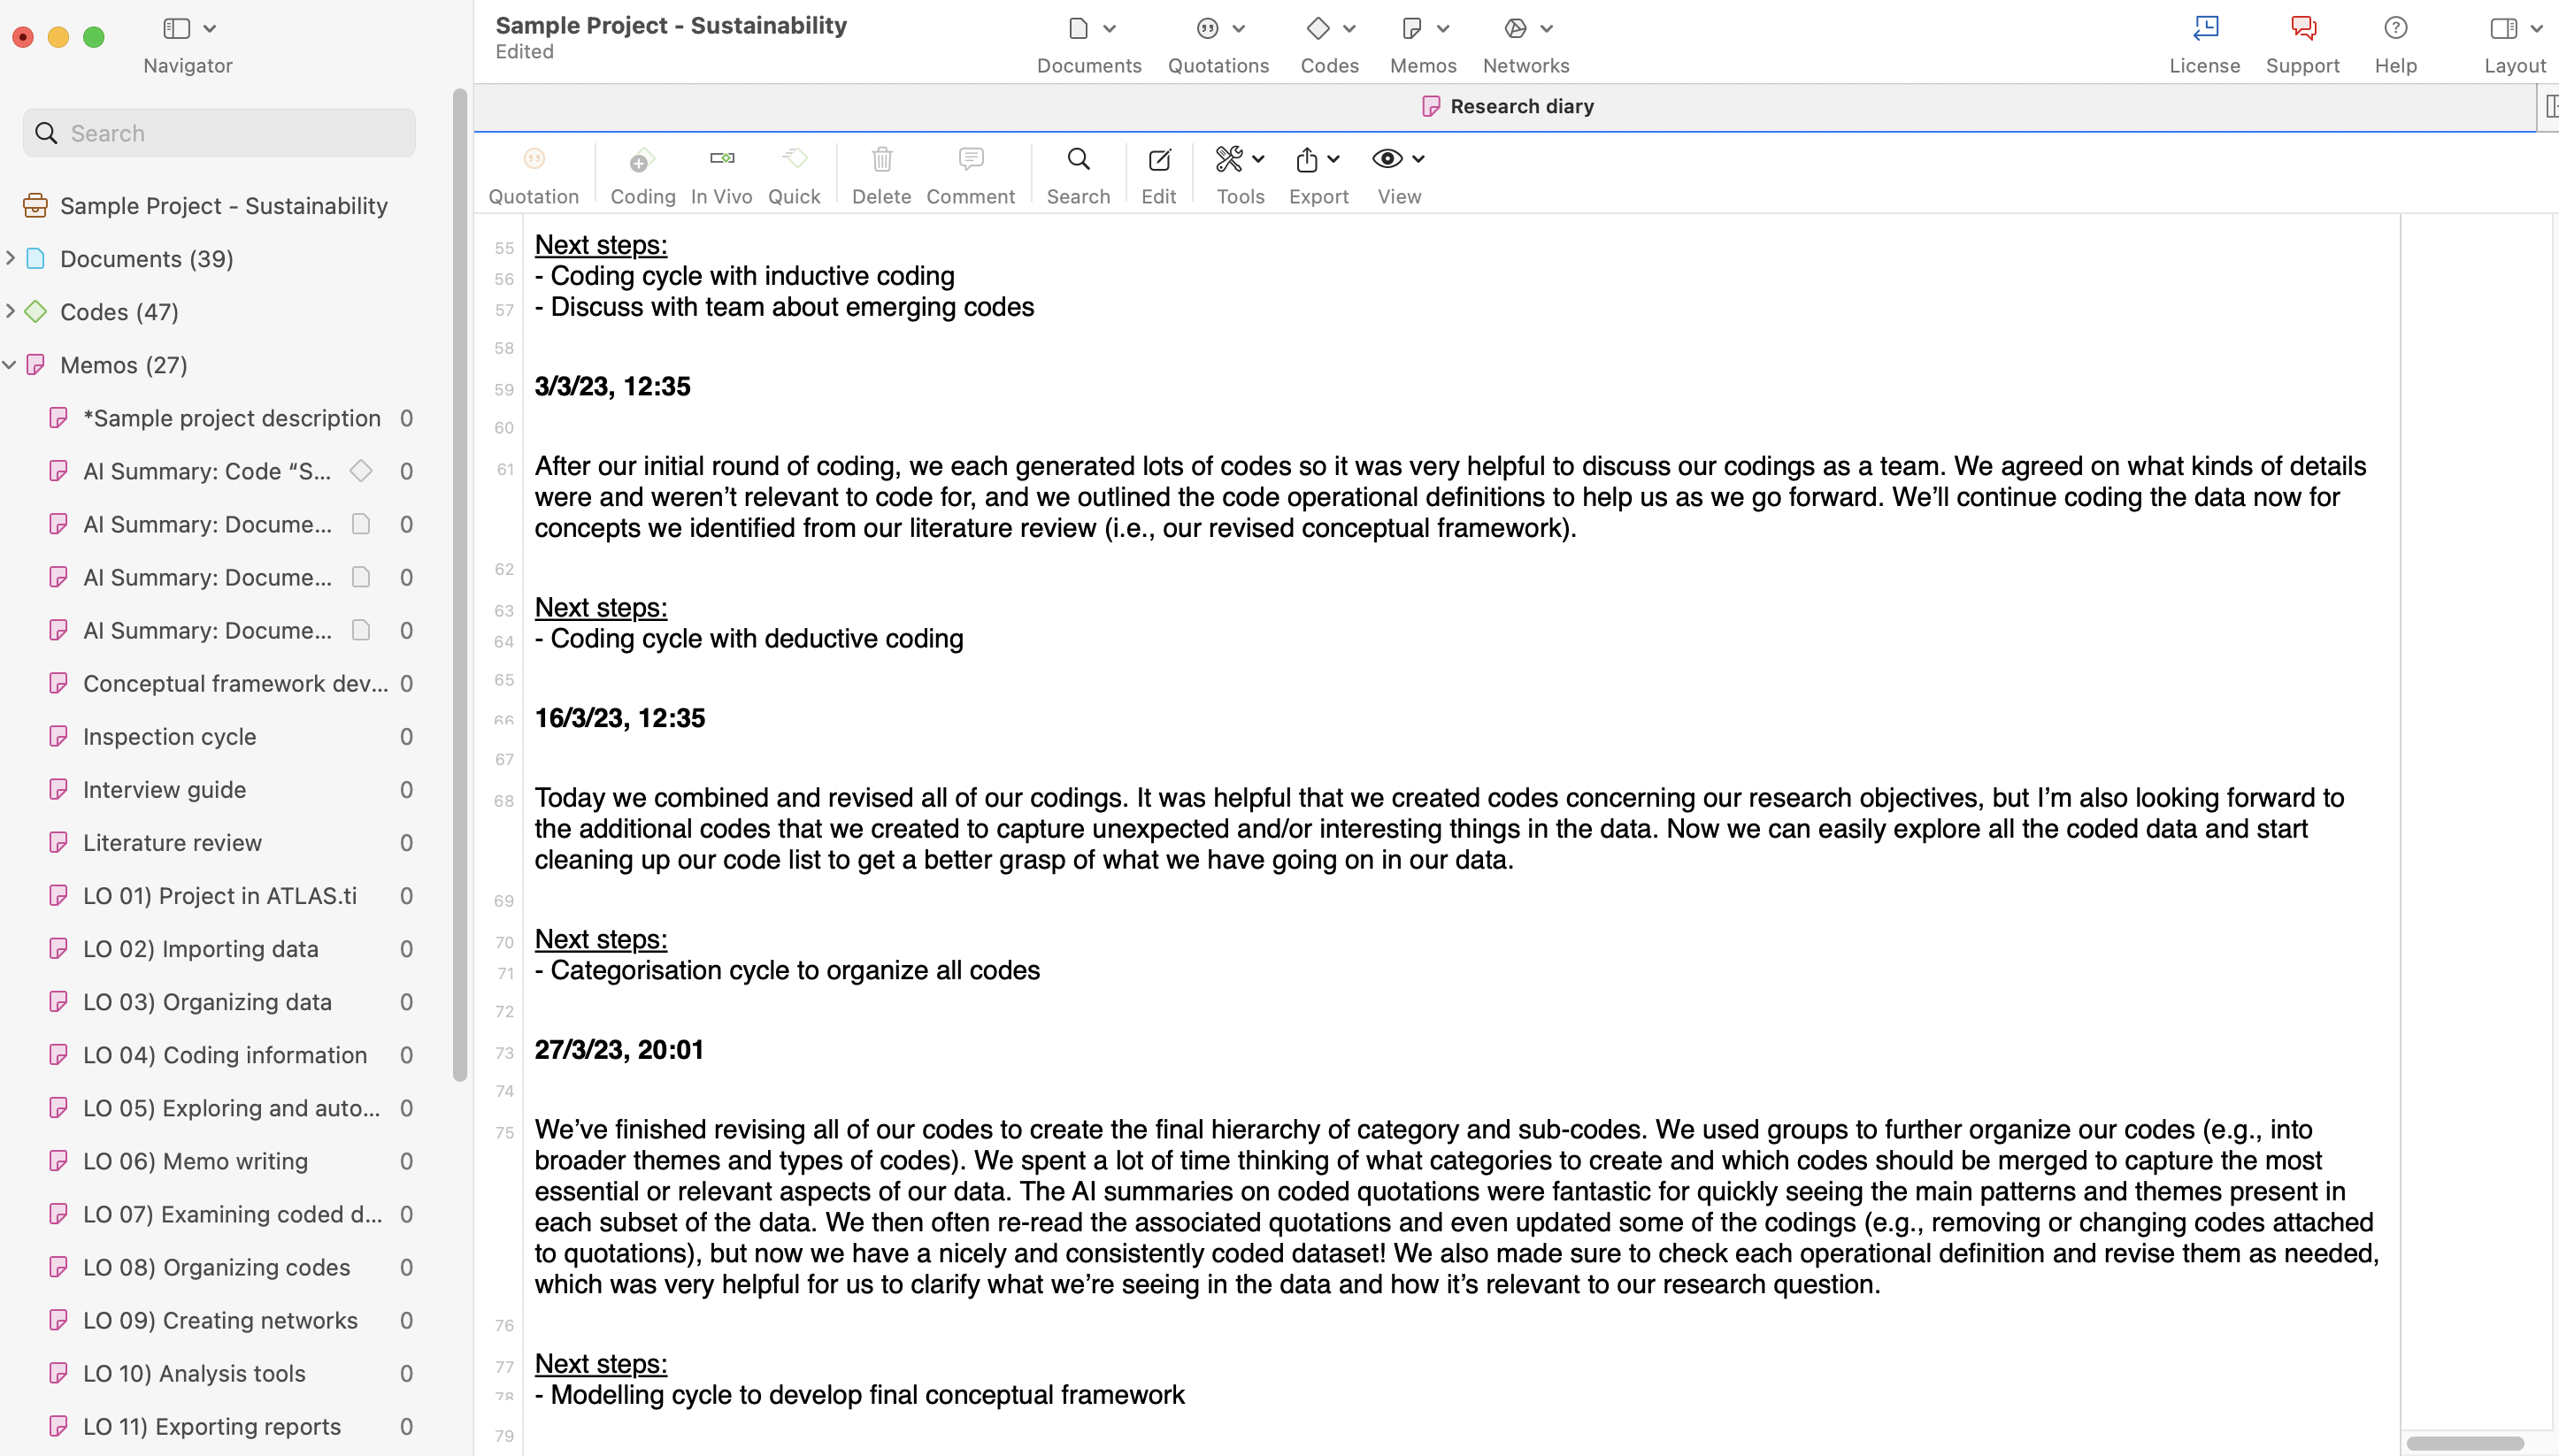
Step 8: Write validation memos
Document your decisions during the review process.
Create memos describing:
- why codes were merged
- why codes were renamed
- why codes were removed
- how categories or groups were developed
- how AI-generated results were refined
- how the final coding structure supports the research question
This creates an audit trail and improves transparency.
Validation checklist
Before using AI-generated codes in reports, presentations, publications, or final analysis, confirm that:
- code names are clear and meaningful
- quotations match the code meaning
- duplicate or overlapping codes have been merged
- broad codes have been refined
- irrelevant codes have been removed or reorganized
- categories, groups, or subcodes are organized logically
- codes align with the research question
- unexpected themes have been reviewed
- validation decisions are documented in memos
- findings have been reviewed manually
Common issues and mistakes
- Accepting AI-generated codes without review
- AI Coding should be the starting point, not the final result. Always review AI-generated codes and quotations before drawing conclusions.
- Focusing only on code frequency
- Frequently occurring themes are not always the most important findings. Low-frequency codes may still be analytically important.
- Deleting codes too quickly
- Always review quotations before removing a code. A code with few quotations may still contain meaningful data.
- Ignoring unexpected themes
- AI may identify patterns you had not anticipated. Review unexpected themes carefully before deciding whether to keep, rename, merge, or remove them.
- Not documenting validation decisions
- Memos help create transparency and support methodological reporting.
- Expecting AI Coding to replace analysis
- AI can identify possible patterns, but researchers remain responsible for interpretation, validation, and conclusions.
When to contact support
Contact ATLAS.ti Support if:
- AI Coding does not complete successfully
- AI-generated codes do not appear in the project
- quotations are missing after AI Coding
- Code Manager or Quotation Manager results appear incomplete
- AI tools are unavailable on your platform
- projects behave unexpectedly after AI Coding
When contacting support, include:
- your platform: Web, Windows, or Mac
- your ATLAS.ti version if using Desktop
- screenshots or error messages
- a description of the AI Coding workflow you used
- details about what you expected and what happened instead