
How to add video, audio, and image data to your project
Key takeaways
- ATLAS.ti Windows and Mac support image, audio, and video files.
- You can add files by using the Add Documents option or by dragging and dropping files directly into your project.
- Audio and video files can be imported with transcripts or transcribed automatically with AI Transcription.
- Large media files can be linked instead of imported to save storage space.
- ATLAS.ti Web does not video and audio files, but images can be inserted into text documents and coded.
Who this article is for
This article is for users working with multimedia data in ATLAS.ti Windows, Mac, or Web who want to add and analyze images, audio recordings, or video files in their projects.
Add image, audio, and video files in ATLAS.ti Windows and Mac
ATLAS.ti Windows and Mac support the following file formats:
Images: bmp, gif, jpeg, jpg, png, tif, tiff
Audio: aac, m4a, mp3, mp4, wav
Video: 3g2, 3gp, 3gp2, 3gpp, asf, avi, m4v, mov, mp4, wmv
For best compatibility across Windows and Mac:
- Use
.mp3files with AAC audio for audio files - Use
.mp4files with AAC audio and H.264 video for video files
Add files to your project
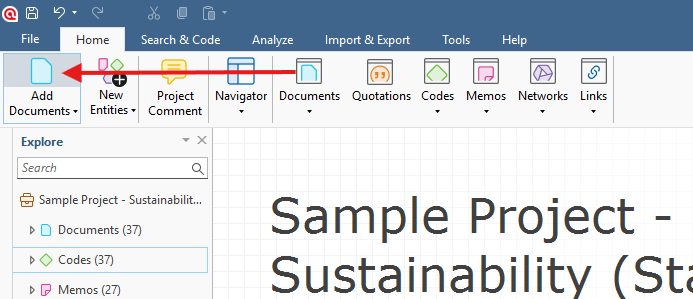
In ATLAS.ti Windows:
-
Go to Home > Add Documents

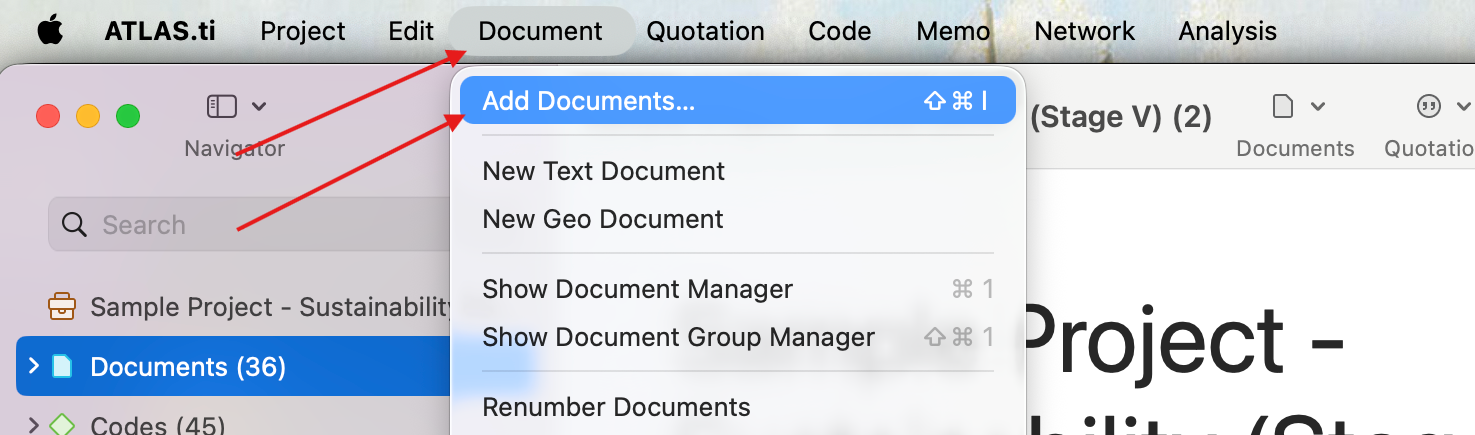
In ATLAS.ti Mac:
-
Go to Document > Add Documents...

You can also drag and drop files directly into your project window.
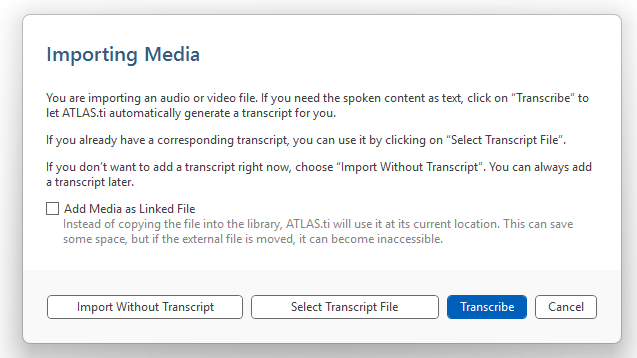
When importing audio or video files, you will see several options:
- Import media without transcript
- Attach an existing transcript file
-
Transcribe the media automatically using AI transcription

Link media files instead of importing them
When adding audio or video files, you can enable the option:
- Add Media as Linked File
This keeps the media file in its current location on your computer instead of copying it into the project library.
This can help reduce project size, especially when working with large video files. Keep in mind:
- If the original file is moved, renamed, or deleted, ATLAS.ti will no longer be able to access it.
- Linked files should stay in a stable folder location throughout your project.
Recommendations for image files
Digital cameras and scanners often create very large image files. Large images require more processing power and storage space.
Before adding images to ATLAS.ti, it is recommended to resize them to a screen-friendly resolution using image editing software.
ATLAS.ti can resize large images automatically, but smaller files usually provide smoother performance.
You can zoom in and out inside ATLAS.ti using:
- the mouse wheel
- the zoom controls
Add images in ATLAS.ti Web
ATLAS.ti Web does not currently support standalone image, audio, or video documents.
However, you can insert images into text documents and code them.
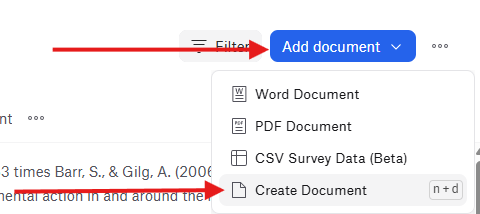
To add an image in ATLAS.ti Web:
- Open the Document Manager
-
Click Add Document and select Create Document
- Inside the new document, click the + button at the beginning of a paragraph
-
Select Insert image
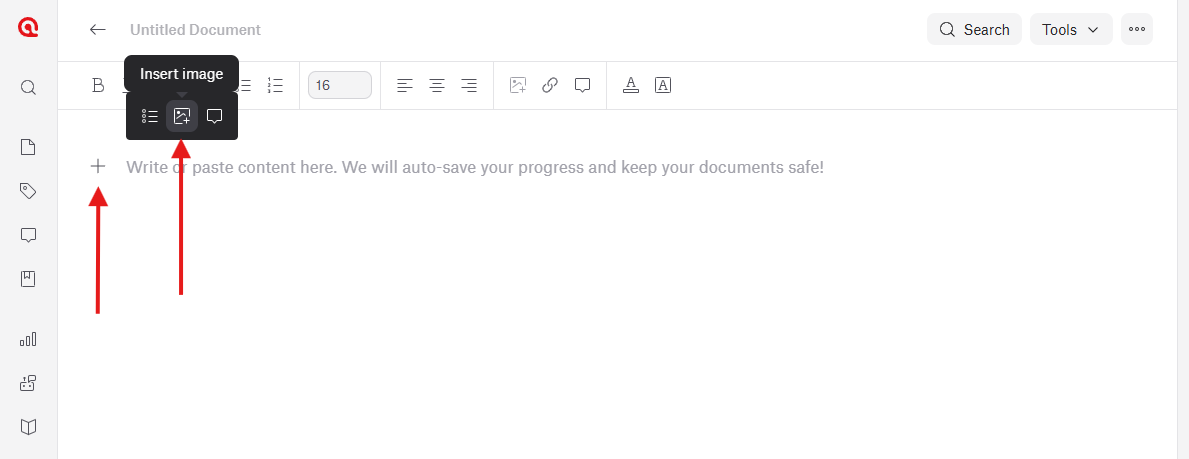
- Upload your image


Once inserted, the image becomes part of the document and can be coded similarly to text selections.
You can select the image and apply codes to it, although selecting specific regions within the image is not currently supported in ATLAS.ti Web.
Common issues
- My video file does not play correctly
- This is usually caused by unsupported codecs. Re-encoding the file as MP4 container, H.264 video or AAC audio typically resolves the issue.
- My linked media file is missing
- If you used Add Media as Linked File, ATLAS.ti depends on the original file location.
- If the file was moved, renamed, or stored on a disconnected drive, relink the file or restore it to its original location.
- My project became very large
- Video files can significantly increase project size. Consider using linked media files instead of importing them directly into the project.
When to contact support
Contact support if:
- media files cannot be imported despite using supported formats
- audio or video playback fails consistently
- linked files cannot be restored
- AI transcription does not complete successfully