
How to use the code manager
Key takeaways
- The Code Manager is where you view, create, edit, organize, merge, delete, and export codes in ATLAS.ti.
- In ATLAS.ti Web, the Code Manager shows codes, colors, comments, groups, groundedness, and creation dates.
- In ATLAS.ti Desktop, the Code Manager can also be used to retrieve coded data, code by drag and drop, review codes in networks, create reports, and explore code content with visualizations.
- Groundedness shows how many quotations are linked to a code. Density shows how many links a code has to other codes.
- You can use the Code Manager before analysis to prepare a deductive code system, or during analysis to refine codes created inductively.
Who this article is for
This article is for ATLAS.ti Web and ATLAS.ti Desktop users who want to understand what the Code Manager does and how to use it to create, review, edit, organize, merge, comment on, and export codes during qualitative data analysis.
What is the Code Manager?
The Code Manager is the central place for managing codes in ATLAS.ti.
You can use it to:
- view all codes in a project
- create new codes
- edit code names
- change code colors
- write code comments or definitions
- review quotations linked to a code
- organize codes into groups, categories, folders, or subcodes
- merge overlapping codes
- delete codes
- export a codebook
In qualitative analysis, codes help you label important segments of data. The Code Manager helps you keep those codes organized and easier to review as your analysis develops.
How to use the code manager in ATLAS.ti Web
Open the Code Manager
- Open your ATLAS.ti Web project.
- Click the codes icon in the left-hand menu.
- Review the list of codes in your project.

Create a new code
- Go to the Code Manager.
- Click the option to create a new code.
- Enter the code name.
- Confirm the new code.
- Repeat this process for any additional codes.

Review quotations linked to a code
- Go to the Code Manager.
- Click a code.
- Click Details to open the sidebar.
- Review the quotations associated with that code.
- Open a quotation if you want to review it in context.
Use this to check whether the code is being applied consistently across your project.

Rename a code
- Go to the Code Manager.
- Hover over the code you want to edit.
- Click Details to open the sidebar.
- Click the code name at the top of the sidebar.
- Type the new code name.

Change a code color
- Go to the Code Manager.
- Click the code you want to edit.
- Click the color circle next to the code name.
- Choose the desired color.
Use colors to visually distinguish code types, categories, themes, or analysis stages.

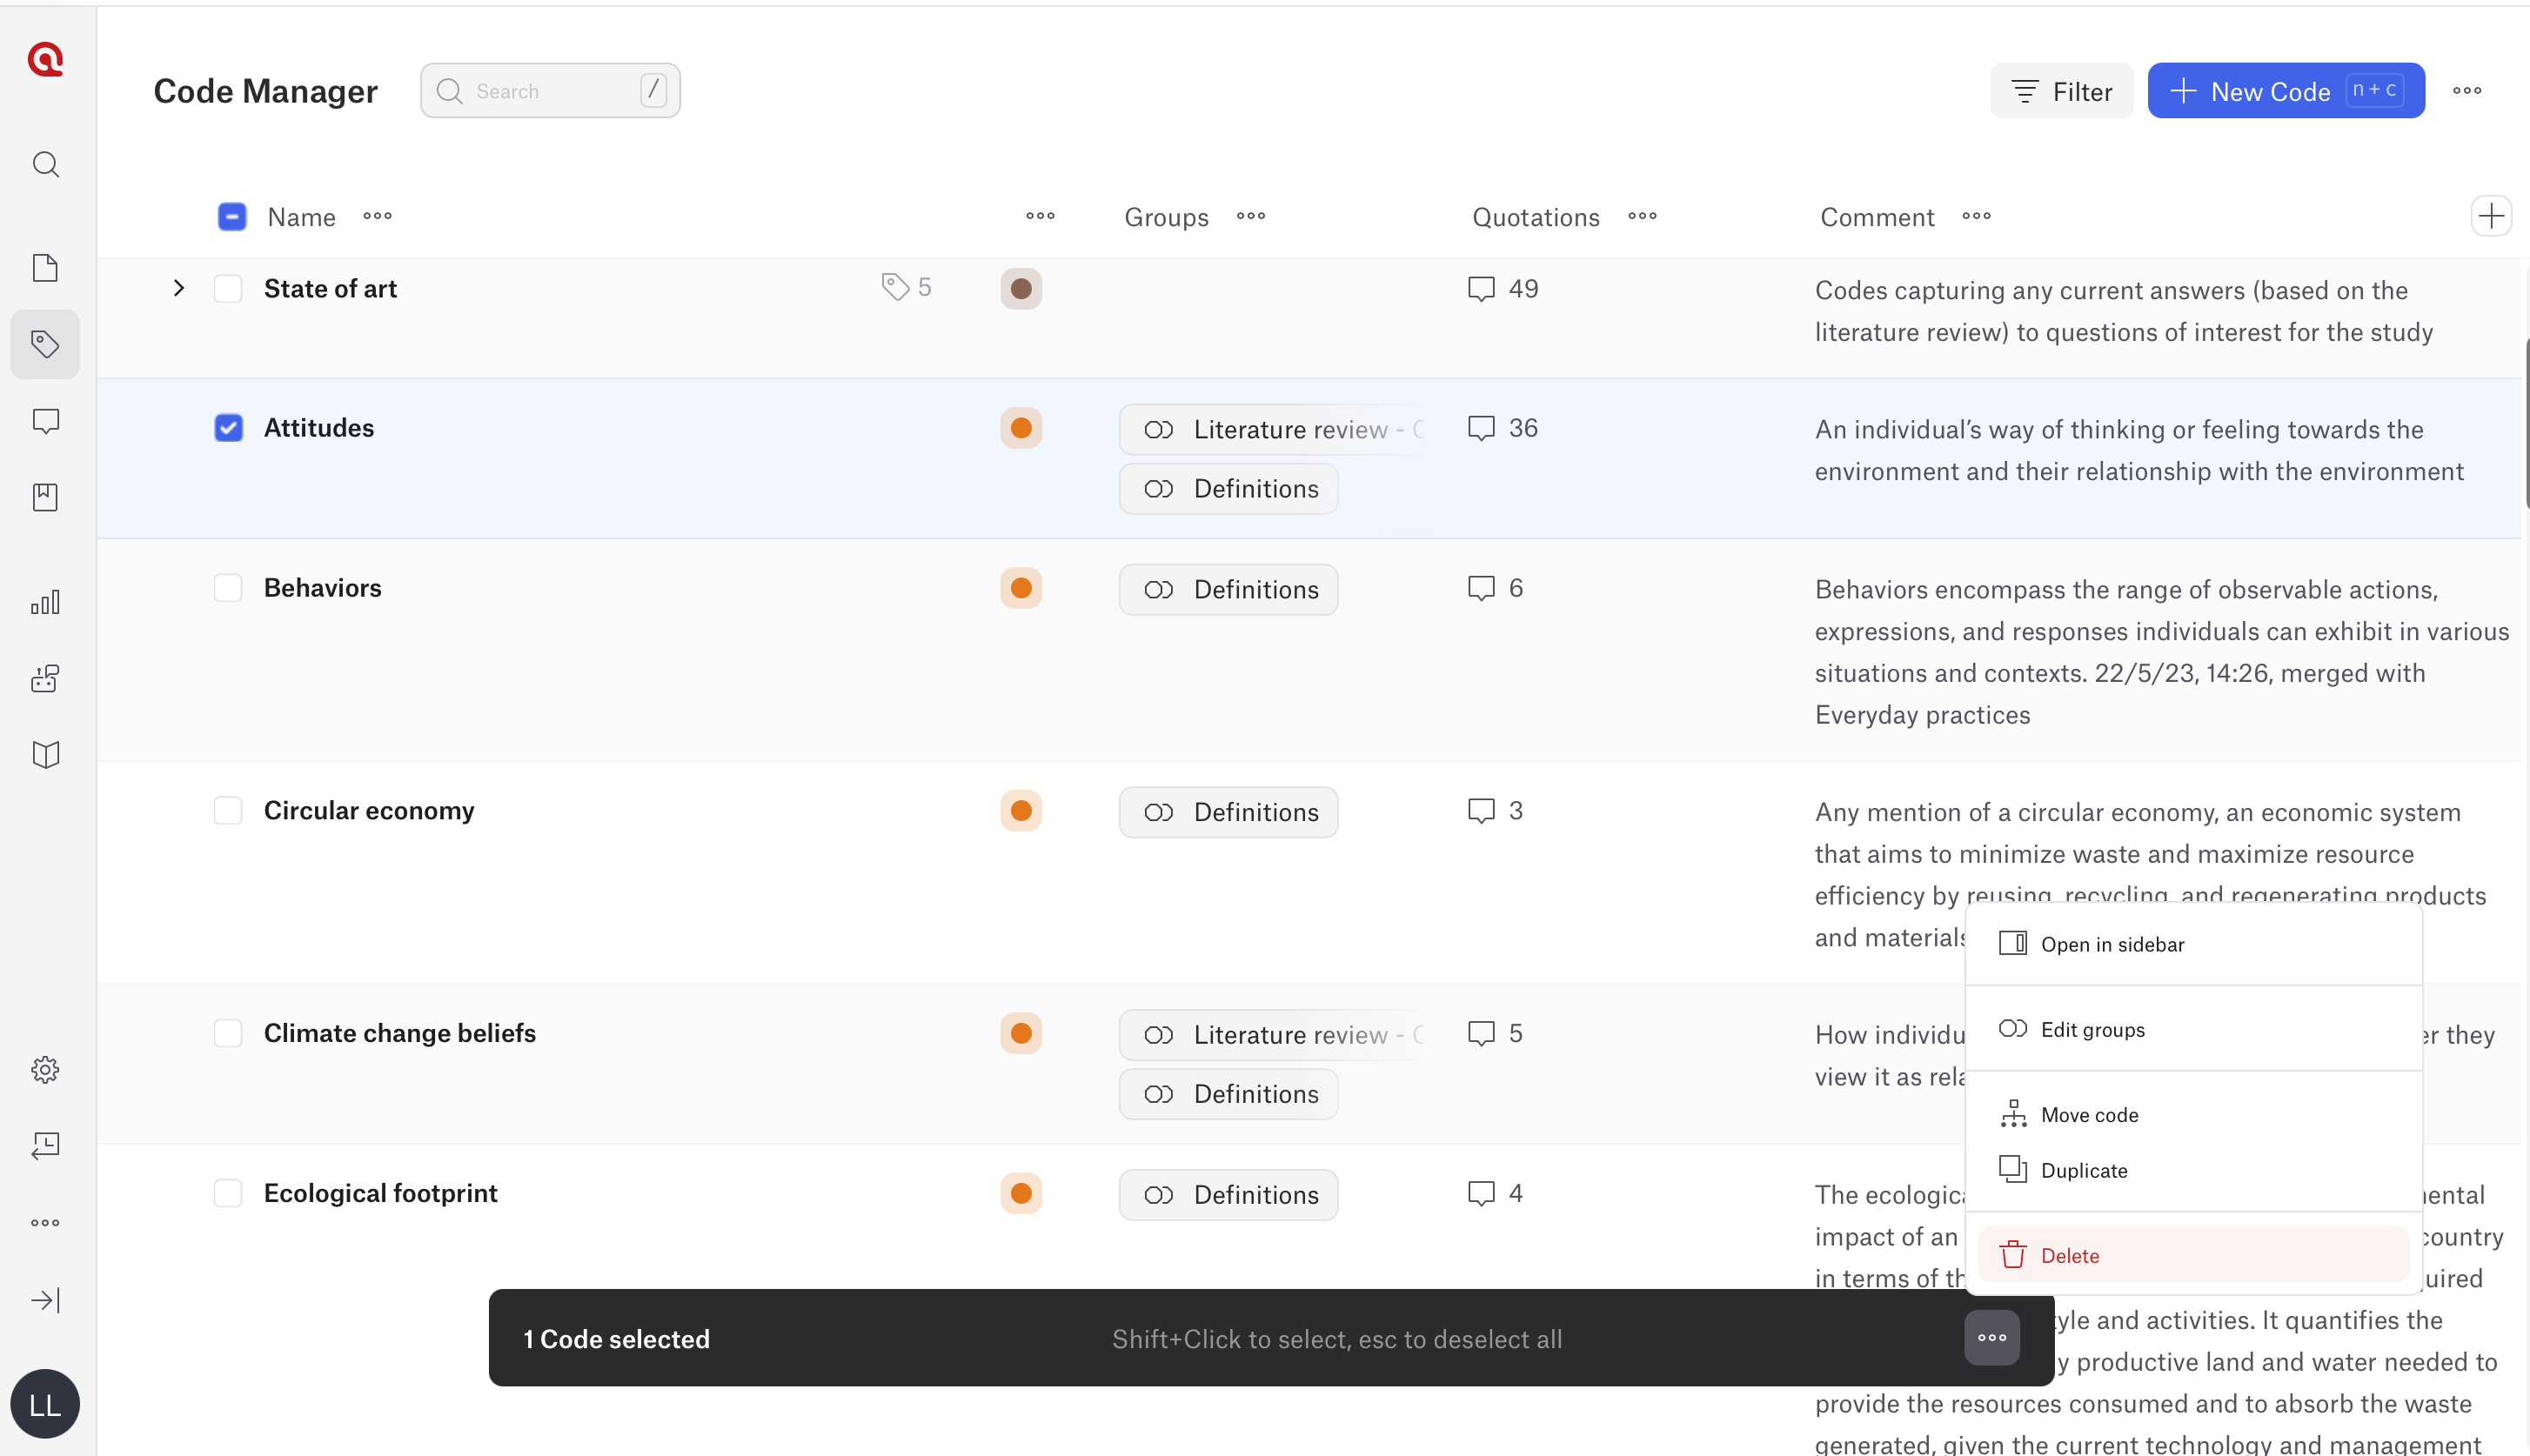
Delete a code
- Go to the Code Manager.
- Tick the box to the left of each code you want to delete.
- Click the three dots at the bottom of the screen.
- Select Delete.
- Confirm the deletion if prompted.
Organize codes into groups
Code groups help you organize and filter codes. A code can belong to more than one group.
- Go to the Code Manager.
- Hover over a code.
- Click Details to open the sidebar.
- Click Edit groups.
- Select an existing group or create a new group.
- To rename or delete groups, click Manage Groups.
- Save your changes.

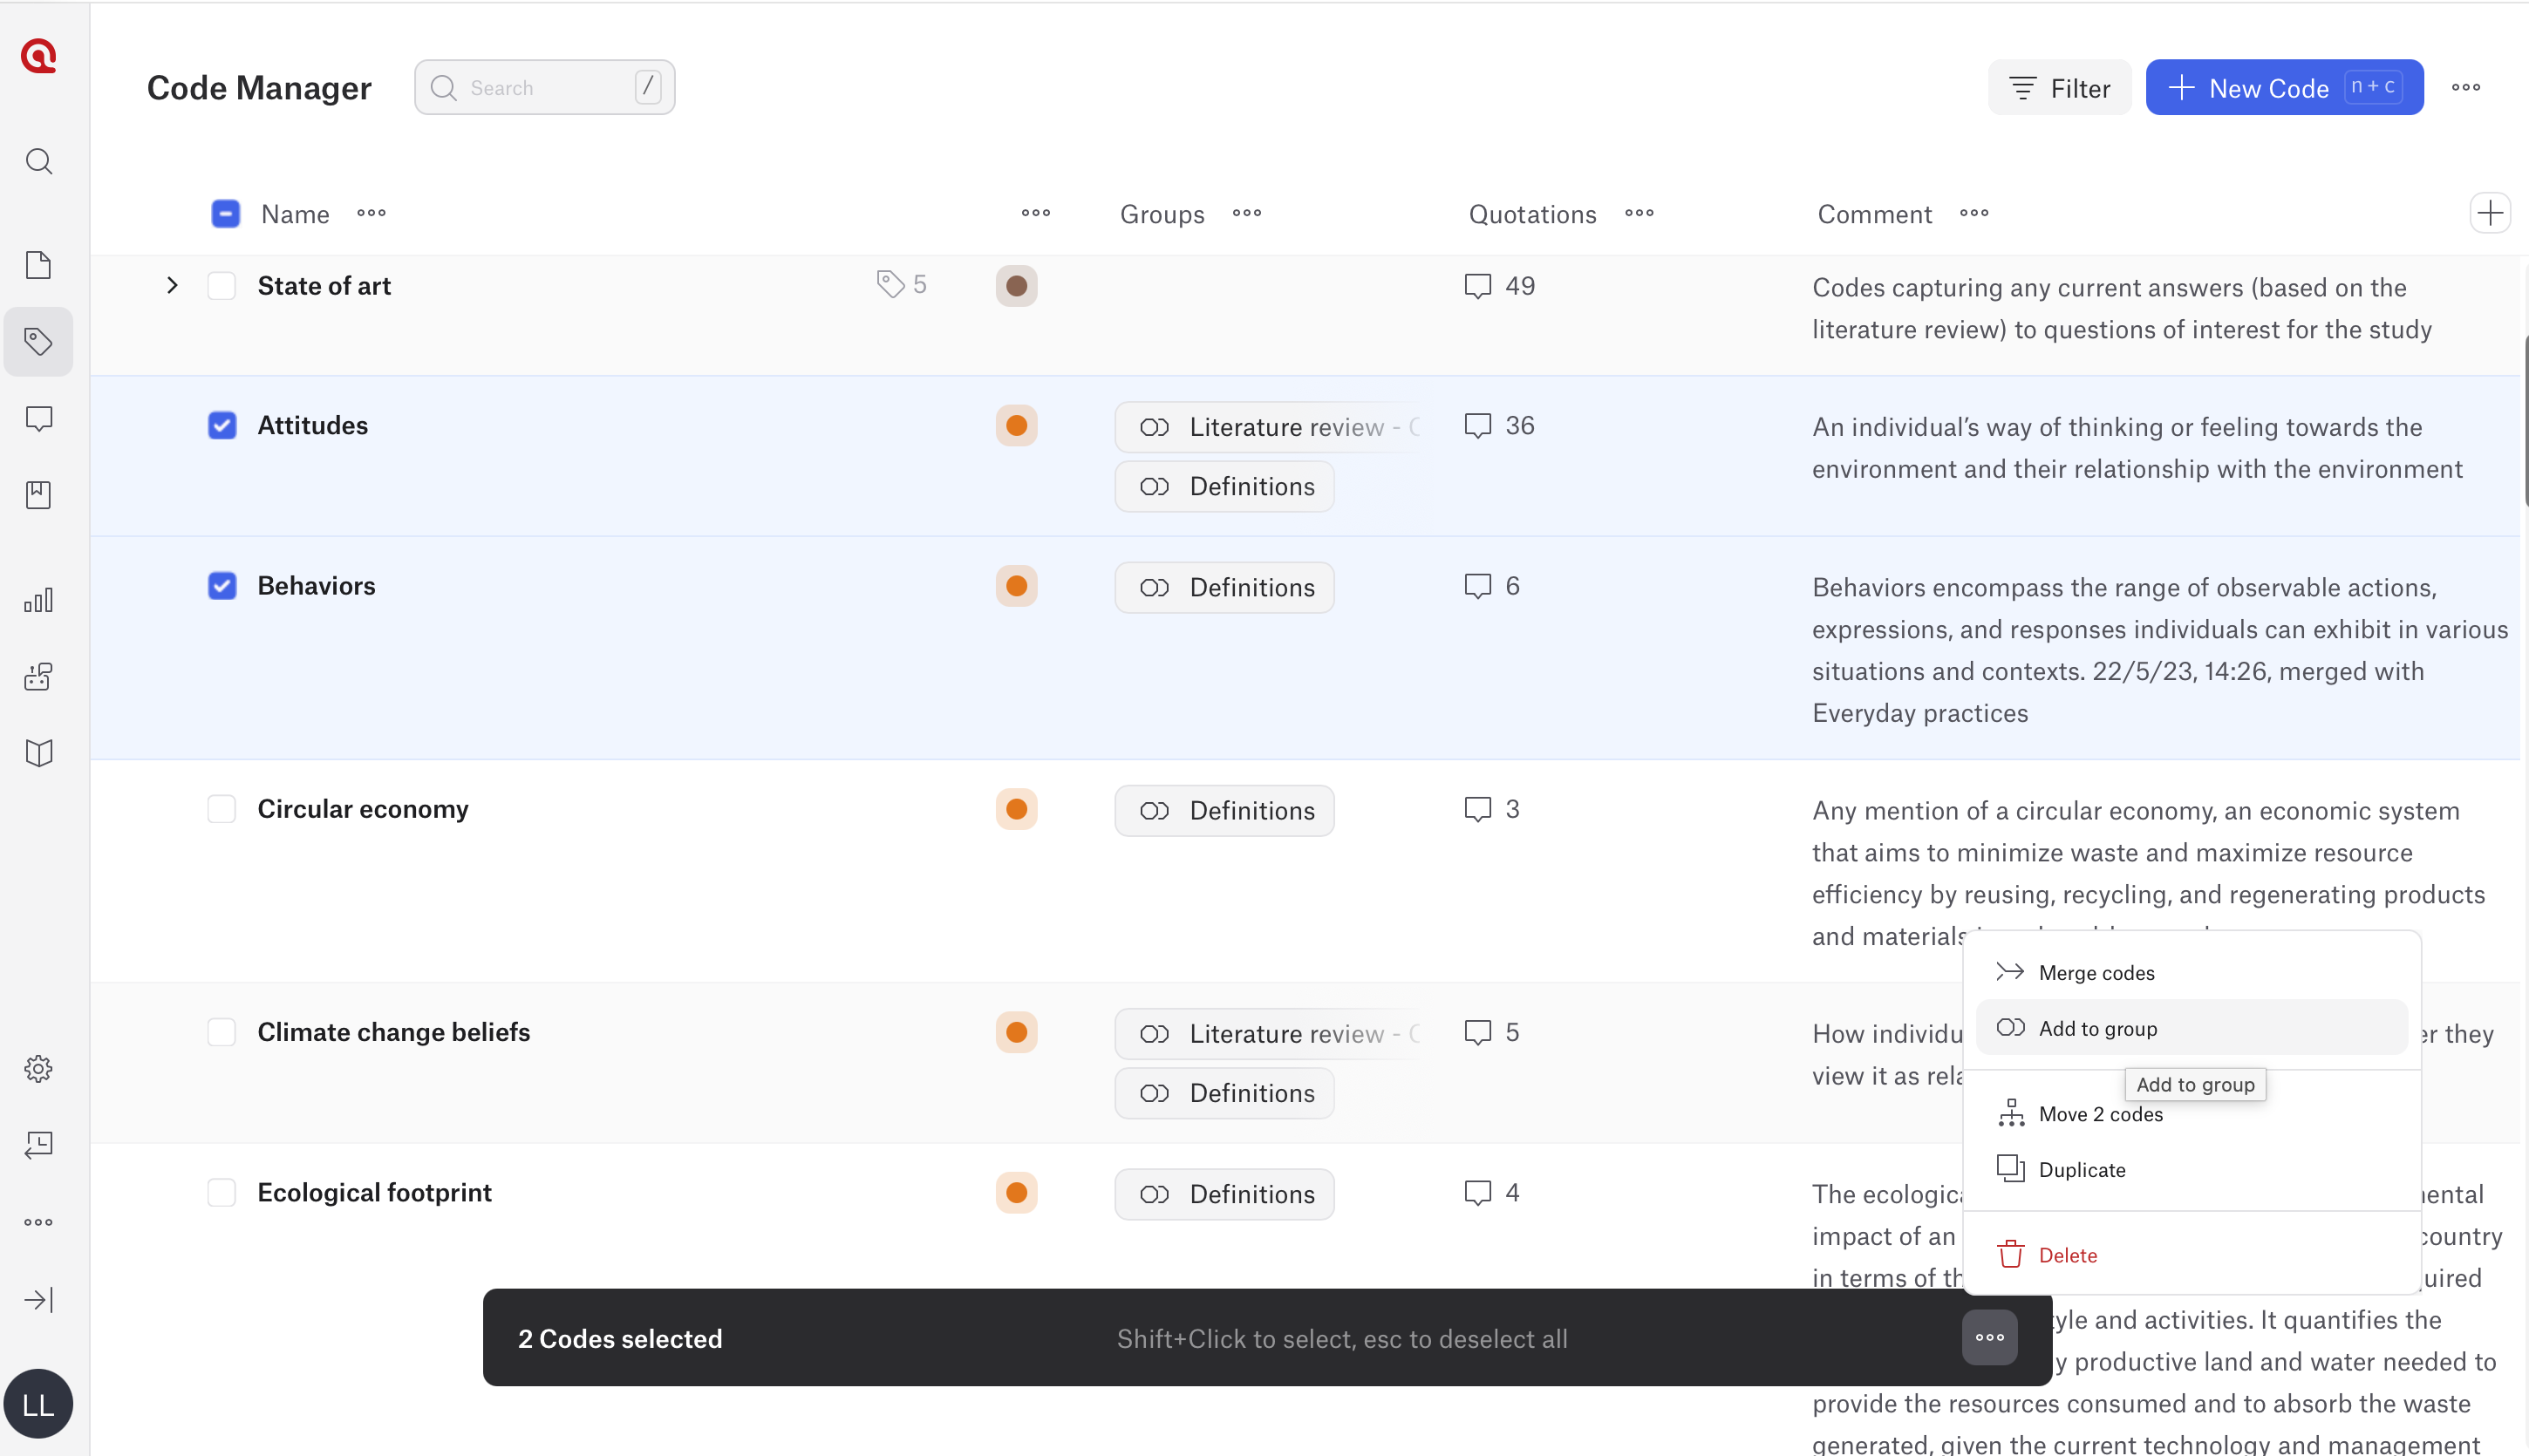
Add multiple codes to a group
- Go to the Code Manager.
- Tick the boxes to the left of the codes you want to group.
- Click the three dots at the bottom of the screen.
- Select Add to group.
- Choose the desired code group.
Organize codes into categories and subcodes
In ATLAS.ti Web, you can organize codes into a hierarchy by creating a category code and placing related codes underneath it as subcodes.
A category code is a parent code used to organize related subcodes. The subcodes represent more specific ideas within the broader category.
Important: A category code should be an empty code. If the code already contains quotations, it cannot be used as a category code unless the quotations are removed or you create a new empty code for the category.
Create subcodes by drag and drop
- Open the Code Manager.
- Click + New Code.
- Enter the name of the category code.
- Click Create new code.

- In the Code Manager, locate the code you want to turn into a subcode.
- Drag the code onto the empty category code.
- Select Make subcode of....
- Repeat this process for any other codes you want to place under the same category.

The selected codes will appear underneath the category code.
Move multiple codes into a category
- Open the Code Manager.
- Tick the boxes next to the codes you want to move.
- Click the three-dot menu at the bottom of the screen.
- Select Move codes.
- Choose the category code.
- Confirm the move.

The selected codes will become subcodes of the category code.
Remove a subcode from a category
You can move a subcode back to the root level if it should no longer belong to a category.
Option 1: Drag and drop
- Open the Code Manager.
- Drag the subcode onto the blue Move to root area.
- Release the code.
Option 2: Move codes menu
- Tick the box next to the subcode.
- Click the three-dot menu at the bottom of the screen.
- Select Move codes.
- Choose Root level (no parent code).
The subcode becomes an independent code again.

Merge codes
Merge codes when two or more codes represent the same idea.
- Go to the Code Manager.
- Tick the boxes to the left of the codes you want to merge.
- Click the three dots at the bottom of the screen.
- Select Merge codes.
- Enter the name of the new merged code.
- Confirm the merge.
When you merge codes in ATLAS.ti Web, the audit trail is saved in the comment field of the merged code.

Split code
In ATLAS.ti Web, there is no direct Split Code function. You can still split a code manually by reviewing the quotations linked to the broad code, creating more specific codes, and reassigning quotations. In ATLAS.ti Desktop, you can use the Split code function.
- In ATLAS.ti Web
Split codes manually in ATLAS.ti Web
Option 1: Use the Quotation Manager
- Open your ATLAS.ti Web project.
- Click the Quotations icon in the left-hand menu to open the Quotation Manager.
- Click Filter.
- Choose Code as the filter type.
- Select the broad code you want to split.
- Click Apply.
- The Quotation Manager now displays the quotations linked to that code.
- Click Details to review the quotation on the side bar
- Click Open if you need to see it in the original document context.
- Decide which more specific code should be applied to the quotation.
- Apply an existing code or create a new code for the quotation.
- If the broad code should no longer apply, remove the broad code from that quotation.
- Repeat this process until all quotations linked to the broad code have been reviewed.
After reviewing all quotations, you can decide whether to keep, rename, or delete the original broad code.
Option 2: Use the Code Manager
- Open your ATLAS.ti Web project.
- Click the Codes icon in the left-hand menu to open the Code Manager.
- Select the broad code you want to split.
- Click Details to open the sidebar.
- Review the quotations linked to that code.
- Open each quotation to inspect it in context if needed.
- Apply a more specific existing code or create a new code.
- Remove the broad code from the quotation if it is no longer appropriate.
- Repeat this process for each linked quotation.
This manual workflow allows you to split the meaning of a broad code into several more precise codes, even though ATLAS.ti Web does not currently include a dedicated split-code function.
Write or edit a code comment
Code comments are useful for writing definitions, coding rules, inclusion criteria, exclusion criteria, or analytic notes.
- Go to the Code Manager.
- Hover over the code you want to edit.
- Click Details to open the sidebar.
- Click inside the comment space.
- Write or edit the code comment.

Export codes
You can export your codes as a codebook.
- Go to the Code Manager.
- Click the three dots in the top-right corner.
- Select Download Codes as QDC or Download Codes as Excel.
- Save the file to your computer.
Use QDC if you want to use the codebook in ATLAS.ti Desktop or another QDA software. Use Excel if you want a spreadsheet version of your code list and definitions.

How to use the code manager in ATLAS.ti Desktop
ATLAS.ti Desktop includes ATLAS.ti Windows and ATLAS.ti Mac. In both versions, the Code Manager helps you create and modify codes, code data segments by drag and drop, set colors, retrieve coded data, organize codes in groups, merge and split codes, filter codes, review codes in networks, and create reports.
Open the Code Manager
In ATLAS.ti Windows and Mac
- Open your ATLAS.ti Windows project.
- Open the Code Manager from the main interface.
- Review the code list.

Create a new code
In ATLAS.ti Windows and Mac
- Open the Code Manager.
- Click New.
- Select Code.
- Enter the code name.
- Confirm the new code.

Apply a code using drag and drop
You can use the Code Manager for coding by dragging codes onto highlighted data segments.
In ATLAS.ti Windows and Mac
- Open a document.
- Highlight the data segment you want to code.
- Open the Code Manager.
- Drag a code from the Code Manager onto the highlighted segment.

Review quotations linked to a code
A double-click on a code opens the linked quotations in the Quotation Reader.
In ATLAS.ti Windows and Mac
- Open the Code Manager.
- Double-click a code.
- Review the linked quotations in the Quotation Reader.
- Open a quotation to view it in context if needed.

Rename a code
In ATLAS.ti Windows and Mac
- Open the Code Manager.
- Select the code you want to rename.
- Click Rename in the ribbon or use the context menu.
- Enter the new code name.
- Confirm the change.

Add or edit a code comment
In ATLAS.ti Windows and Mac
- Open the Code Manager.
- Select the code.
- Right click and select Edit Comment.
- Write or edit the code definition.
- Save the comment.

Change a code color
In ATLAS.ti Windows and Mac
- Open the Code Manager.
- Select one or more codes.
- Click Change Color.
- Choose the desired color.

Delete code(s)
- In ATLAS.ti Windows
- Open the Code Manager.
- Select the code(s) you want to delete.
- Click Delete in the ribbon.
Alternatively:
- Right-click the code(s) in the Code Manager or Project Explorer.
- Select Delete.
After selecting Delete, ATLAS.ti asks whether you also want to delete the quotations associated with the code, if any.
- Click Yes if you want to delete the associated quotations as well.
- Click No if you want to keep the quotations and only delete the code from the project.

- In ATLAS.ti Mac
- Open the Code Manager or Project Explorer.
- Right-click the code(s) you want to delete.
- Select Delete.

After selecting Delete, ATLAS.ti asks whether you also want to delete the quotations associated with the code, if any.
- Click Yes if you want to delete the associated quotations as well.
- Click No if you want to keep the quotations and only delete the code from the project.
Organize codes into groups
Code groups help you filter, organize, and compare related codes.
In ATLAS.ti Windows and Mac
- Open the Code Manager.
- Select one or more codes.
- Create a new code group or add the selected codes to an existing group.
- Use the group filter area to view codes from selected groups.

Organize codes into categories, subcodes, or folders
ATLAS.ti Desktop supports independent codes, category codes, subcodes, and folders. A category code is created when codes are moved underneath it, and the category retrieves quotations from its subcodes rather than being used to code quotations directly.
A category code should be empty and should not contain quotations. If the code already contains quotations, create a new empty code first and use that empty code as the category.
Create a category by drag and drop
In ATLAS.ti Windows and Mac
- Open the Code Manager.
- Click New.
- Select Code.
- Enter the name of the category code.
- Confirm the new code.
- Select one or more existing codes that should become subcodes.
- Drag the selected code or codes onto the empty category code.
- Select Move code ... under ....
- Review the new hierarchy in the Code Manager.

Create a category from selected codes
In ATLAS.ti Windows and Mac
- Open the Code Manager.
- Select the codes that should become subcodes.
- Right-click the selected codes.
- Select New Category Code from Selection.
- Enter the name of the new category code.
- Confirm the action.
The selected codes become subcodes under the new category code.


Split a broad code into subcodes
Use this option when one broad code contains multiple ideas that should be separated into more specific subcodes.
In ATLAS.ti Windows and Mac
- Open the Code Manager.
- Right-click the broad code.
- Select Split into Subcodes.
- Create the new subcode names.
- Assign quotations to the appropriate subcodes.
- Keep unmatched quotations under Undecided if needed.
- Choose whether to copy comments, copy links, or make the subcodes mutually exclusive.
- Confirm the split.

Split and Split into Subcodes are different. Split creates independent codes. Split into Subcodes creates a category with subcodes.
Split Code
- In ATLAS.ti Window
- Open the Code Manager.
- Select the code you want to split.
- Click Tools in the ribbon
- Select Split Code
Alternative option:
- Right-click the code in the Code Manager, Project Explorer, or Code Browser.
- Select Split Code

Then continue in the Split Code tool:
- Review the list of quotations linked to the original code.
- Click Add Codes.
- Enter the labels for the new codes.
- Press the down arrow to move to the next entry field and enter another code label.
- Click Create when all new code labels have been entered.
- Select a quotation in the list.
- Review the quotation content shown at the bottom of the screen.
- Assign the quotation to one or more new codes by clicking the relevant checkboxes.
- Repeat this process for the remaining quotations.
- Select options such as Copy Comments, Copy links, or Mutually exclusive if needed.
- Click Split Code.

- In ATLAS.ti Mac
- Open the Code Manager or Project Explorer.
- Right-click the code you want to split.
- Select Split.

Then continue in the Split Code tool:
- Review the list of quotations linked to the original code.
- Click Add Codes.
- Enter the labels for the new codes.
- Press the right arrow to move to the next entry field and enter another code label.
- Click Add when all new code labels have been entered.
- Select a quotation in the list.
- Review the quotation content shown at the bottom of the screen.
- Assign the quotation to one or more new codes by clicking the relevant checkboxes.
- Repeat this process for the remaining quotations.
- Select options such as Copy Comments, Copy links, or Mutually exclusive if needed.
- Click Split Code.

Remove a subcode from a category
In ATLAS.ti Windows and Mac
- Open the Code Manager.
- Drag the subcode toward the left edge of the Code Manager.
- Wait until the vertical blue highlight appears.
- Release the code.
The code becomes an independent code again. You can also drag the subcode onto Codes in the Project Explorer to move it back to the root level.
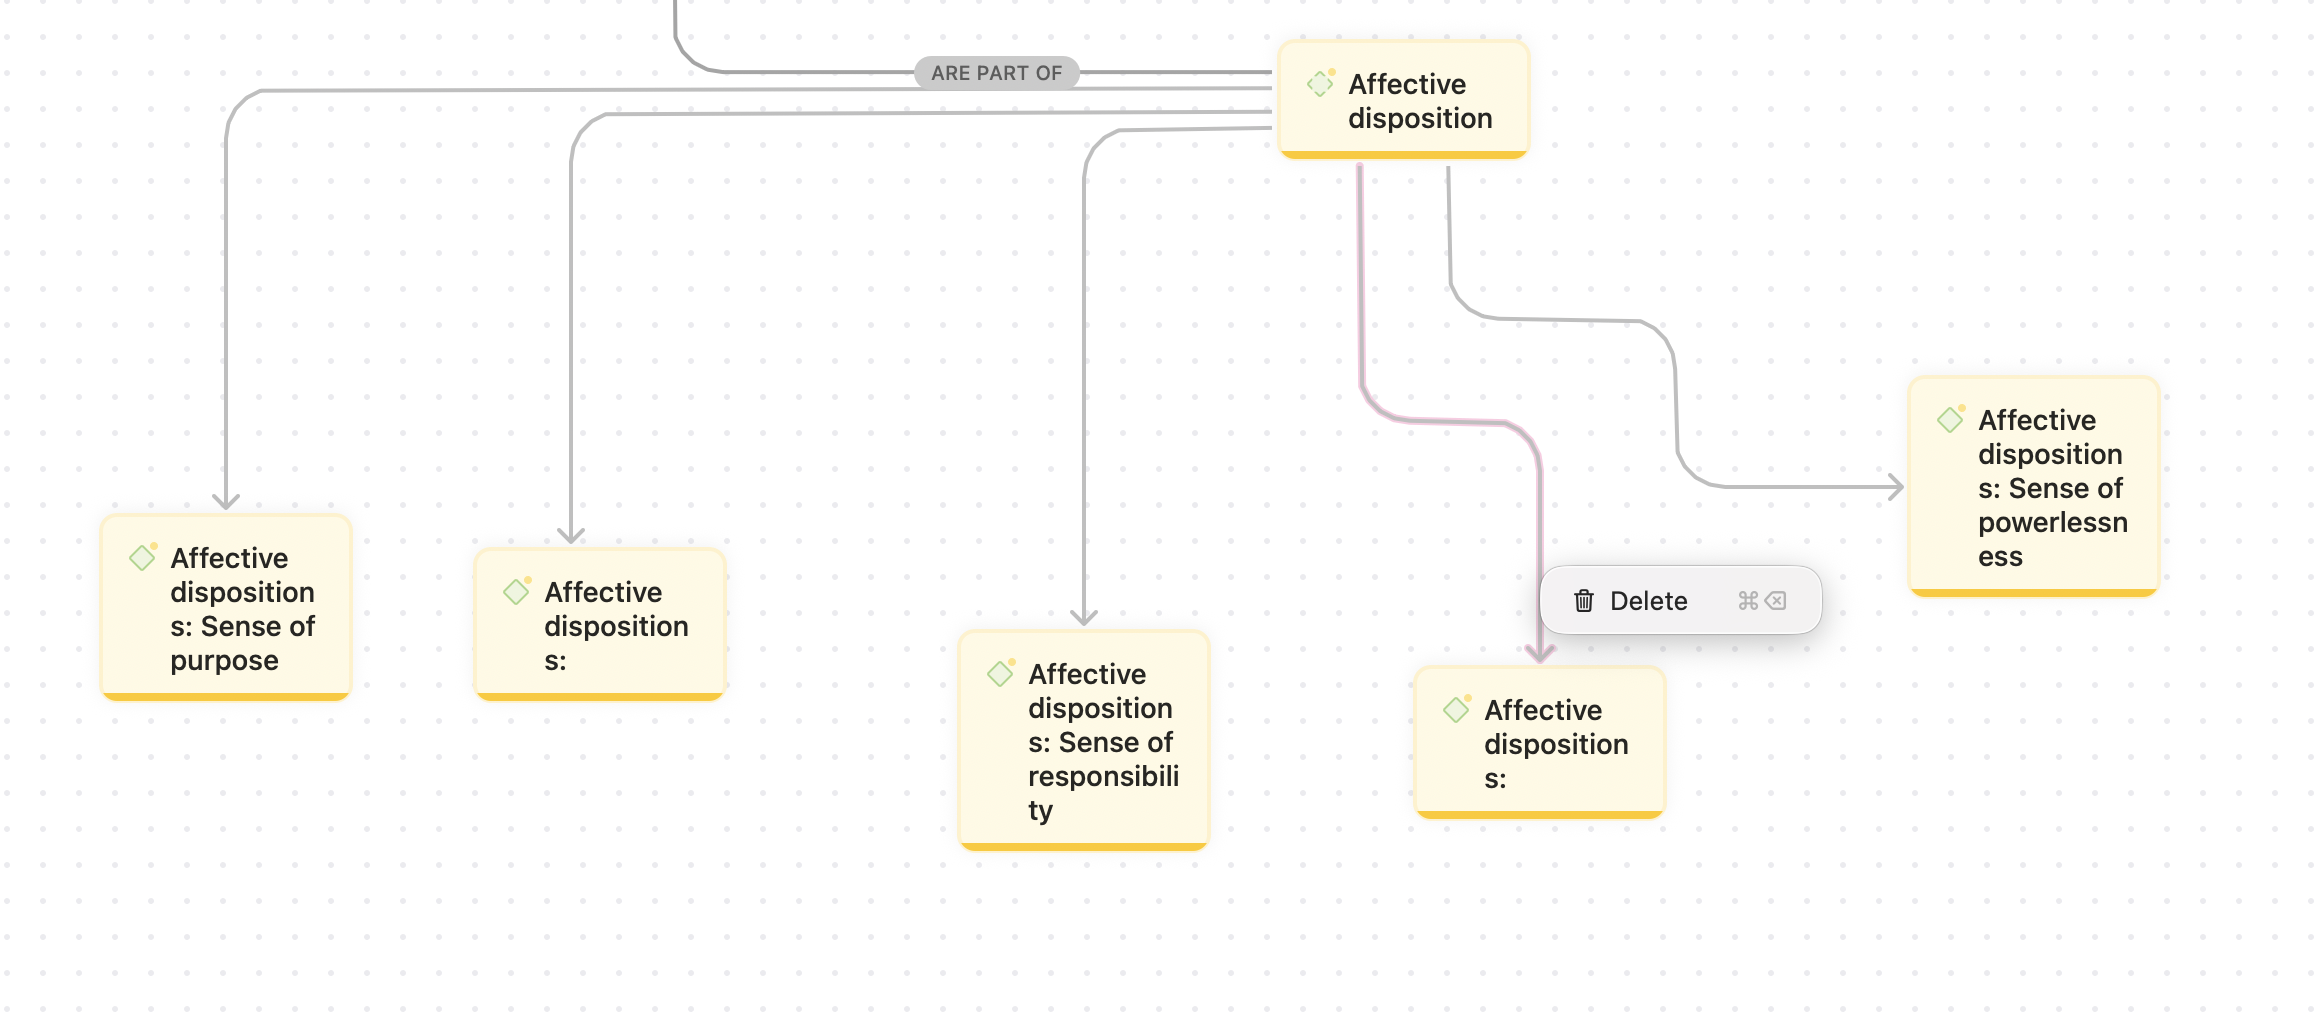
Remove a subcode from a category using a Network
You can also remove the relationship between a category code and a subcode by using a Network. This keeps both codes in the project, but the selected code will no longer appear as a subcode under that category.
- Open the Code Manager.
- Right-click the category code.
- Select Show in Network.
Alternatively:
- Open or create a new Network.
- Drag the category code into the Network.
Then:
- Right-click the category code in the Network.
- Select Add Neighbors.
- Select Linked Codes.
- Locate the link between the category code and the subcode you want to remove.
- Select the arrow or link between the category code and the subcode.
- Press Delete or select Delete from the available menu.
This removes the link between the category code and the subcode. The subcode remains in the project, but it is no longer placed under that category.
Organize codes with folders
Folders are useful when you need another level of organization for a large code system.
In ATLAS.ti Windows and Mac
- Open the Code Manager.
- Click New.
- Select Folder.
- Enter the folder name.
- Move codes or categories into the folder as needed.
You can also select one or more codes, right-click them, and select New Folder from Selection.

Merge codes
Use merging when two or more codes represent the same concept.
In ATLAS.ti Windows and Mac
- Open the Code Manager.
- Select the codes you want to merge.
- Right click and select "Merge" or you can drag and drop the code
- Choose the final code name.
- Review the merged code and linked quotations.


Open selected codes in a network
In ATLAS.ti Windows and Mac
- Open the Code Manager.
- Select one or more codes.
- Click Show in Network.
- Review the selected codes and their links in the network.

Import Code list
- In ATLAS.ti Windows
- Open your project.
- Open the Code manager
- Select Tools
- Select Import Codebook (XLSX).

- In ATLAS.ti Mac
- Open your project.
- Go to Code manager
- Click Codes > Import > Codebook (XLSX).

Export Code list
- In ATLAS.ti Windows
- Open your project.
- Open the Code Manager.
- Click Export.
- Select Export codebook (XLSX).

- In ATLAS.ti Mac
- Open your project.
- Open the Code Manager.
- Click Export.
- Click Codebook (XLSX)

Create reports from codes
In ATLAS.ti Windows and Mac
- Open the Code Manager.
- Select Export
- Open the report option.
- Choose the report format.
- Export or save the report.


Create and export code visualizations
In the Code Manager, you can change the code list into a visual display and export the visualization as an image.
- In ATLAS.ti Windows
- Open the Code Manager.
- Click View.
- Choose the visualization you want to display.
Available options include:
- Diagram
- Cloud
- Bar Chart
- Tree Map
- Review the visualization.
- Click Export.
- Save the visualization as an image.

- In ATLAS.ti Mac
- Open the Code Manager.
- Click the View Mode option at the top of the window.
- Change the display from the default list view to the visualization you want.
Available options include:
- Chart
- Cloud
- Tree Map
- Review the visualization.
- Click Export.
- Select Image.
- Save the visualization as an image.

Common issues and mistakes
- Creating too many similar codes
- If several codes describe the same idea, merge them to keep your code list easier to manage.
- Forgetting to write code comments
- Code comments help explain what each code means and when it should be applied. They are especially useful when creating a codebook or working in a team.
- Using code groups, categories, and folders for the same purpose
- Code groups, categories, and folders are different.
- Code groups are useful for filtering and comparing related codes. A code can belong to more than one code group.
- Categories and subcodes create a hierarchy. A category code acts as a parent code, and subcodes sit underneath it.
- Folders help organize larger parts of the code system, especially in large Desktop projects.
- Use code groups when you need flexible grouping. Use categories and subcodes when you want to show a parent-child relationship. Use folders when you need to organize large sections of your code system.
- Code groups, categories, and folders are different.
- Deleting codes too quickly
- Deleting a code can remove an important part of your coding structure. Review the linked quotations before deleting a code.
- Not reviewing groundedness
- Groundedness shows how many quotations are linked to a code. Use this information to identify codes that may be overused, underused, or ready for review.
- Not exporting the codebook
- Export your codes when you need to share your codebook, document your analysis, or move code structures between projects or platforms.
When to contact support
Contact ATLAS.ti Support if:
- the Code Manager does not open
- codes are missing or not displaying as expected
- quotations do not appear when you select or double-click a code
- you cannot rename, delete, merge, or export codes
- code groups, categories, subcodes, or folders do not behave as expected
- code comments are not saving
- codebook export fails
- the Code Manager behaves differently from the documentation
When contacting support, include:
- your platform: Web, Windows, or Mac
- your ATLAS.ti version if using Desktop
- screenshots or error messages
- a short description of what you were trying to do
- whether the issue affects one code, several codes, or the whole project